Set Up Product Pricing
You can use the Suggested Retail Price section of the Product portal to determine how to price your product. Enter information in the following sections:
Price Options
You can use the Price Options section of the Product portal to enter additional settings for product pricing, with the following options:
Allow Dynamic Product Price
Select to enable the product for a dynamic product price. Dynamic products are created with parameters that are added to the URL. For more information, see Dynamic Products.
Note
Before a dynamic product price can be applied to a product, this functionality must be activated for your account and a seed must be defined in the Additional Details section of Account Setup in the Commerce Assistant. See Account Setup ✱.
Shipping Configuration
If this product is a physical product, select a shipping configuration. You must have shipping configurations set up already for them to display in the drop-down list.
Base Price
Important
Before you enter product prices, it's recommended that you:
- Decide on a pricing method and whether you want the prices to float based on the daily exchange rate or to be fixed according to prices you set for each currency, see Pricing Methods.
- Decide how to implement the pricing: through the product itself or through price configurations with the Applicable Price Configurator. For more information, see Pricing Implementation.
- Consider pricing for localized customer
 An individual or business purchasing your product or service by placing an order through Cleverbridge. The customer is the end user of this product, as they are not allowed to resell the purchased products or services.
A customer is unique per client. If a customer purchases products or services from two different clients, there are 2 separate records of said customer. regions. For more information, see Localize Your Checkout Pages.
An individual or business purchasing your product or service by placing an order through Cleverbridge. The customer is the end user of this product, as they are not allowed to resell the purchased products or services.
A customer is unique per client. If a customer purchases products or services from two different clients, there are 2 separate records of said customer. regions. For more information, see Localize Your Checkout Pages. - Determine if you want to offer discounts for bulk purchases. For more information, see Use Volume Pricing.
You can use the Base Price section of the Product portal to set up pricing for the product. In this section you can set up:
Set Up Regular Pricing
In the
Note
The following settings only pertain to taxable transactions. For customers outside countries with taxation obligations, the Price type for taxation setting is irrelevant. Their prices will always be calculated based on the defined price, regardless of this additional setting.
| Option | Description |
|---|---|
| Gross price |
To provide a better shopping experience for your customers in countries with taxation obligations, you can configure every cart to always display a single tax-inclusive price to shoppers. However, with this strategy, if German customers (19% VAT) pay the same gross price as Danish customers (25% VAT), the VAT rates will make a difference in the revenue you generate. |
Gross Price Example
In the following example, the customer in a country with no taxation obligations doesn't pay tax, but the gross price is the same as for EU customers who do pay tax, for example.
| Customer Type | Gross Price | Tax | Net Price |
|---|---|---|---|
| EU Customer 1 in Germany | 39€ | 6,22€ | 32,78€ |
| EU Customer 2 in Denmark | 39€ | 9,75€ | 29,25€ |
| Non-EU Customer in a non-tax country | 39€ | 0 | 39€ |
Bottom line: Your revenue will fluctuate if you select this option, but you’ll display “marketing-friendly” pricing.
| Option | Description |
|---|---|
| Net price |
This approach lacks a “marketing-friendly” price display, but it preserves a consistent revenue stream. This means you can choose to generate the exact same revenue on every single transaction from EU consumers. With this approach, different consumers from different countries will pay different gross prices in your shopping cart. It is important to note that you will not know the exact end-price the customer will pay, due to the distinct tax rates. |
Important
For US customers, the Price type for taxation setting is irrelevant. The purchase![]() An order made by a customer and the records associated with it. price is always considered the net purchase price, based on which the state sales tax is calculated.
Each county, city, and special district can add their sales tax on top of the state tax rate. For more information on the US tax rates, see Tax Rates for Digital Products.
An order made by a customer and the records associated with it. price is always considered the net purchase price, based on which the state sales tax is calculated.
Each county, city, and special district can add their sales tax on top of the state tax rate. For more information on the US tax rates, see Tax Rates for Digital Products.
Net Price Example
In the following example, US Customer 1 in Louisiana and US Customer 2 in Illinois pay different sales tax due to the different state, local, and city tax rates and regulations in the United States. Being a non-profit organization, the third US Customer in Illinois does not pay sales tax. Nonetheless, the net price remains the same for all three customers.
| Customer Type | Net Price | Tax | Gross Price |
|---|---|---|---|
| US Customer 1 in Louisiana | $40 | $3.78 | $43.78 |
| US Customer 2 in Illinois | $40 | $3.90 | $43.90 |
| US Customer in Illinois (tax exempt) | $40 | 0 | $40 |
Your revenue stream remains consistent if you select this option, regardless of the respective local, state or national tax rates and regulations.
The base currency is the default currency in which the product is priced. If you do not define specific prices for other currencies, then the prices for those currencies will be converted from the base currency based on the daily floating exchange rate.
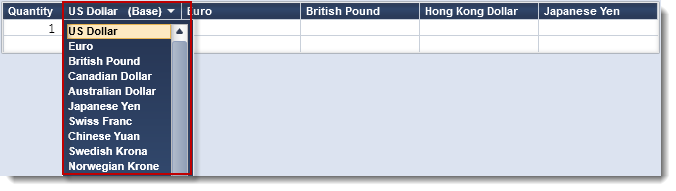
In the price grid, the base currency is located in the second column and is followed by the word (Base). To change the base currency for this product, click the column header for the base currency and select a different currency from the drop-down list.

Note
By default, the default base currency as set up in the Commerce Assistant under Account Setup > Currencies is displayed. For more information, see Account Setup ✱.
Other currencies are displayed to the right of the base currency. To add more currencies for this product:
-
Click the
 button on the right. The list of currencies displays.
- Select a currency from the list. The currency is added to the price grid.
- In the first row of the price grid, enter a price in the base currency column. For the other currencies, prices in gray text display. These are prices based on the daily currency exchange rate.
- To enter prices for the other currencies, click in that currency's column and enter a price.
- Click Accept.
Warning
The prices that display in gray text for the other currencies after you enter a base price will not be automatically saved. You must enter a price and save the product in order![]() An agreement between a seller and a buyer to exchange goods and/or services for money. An order can: - contain multiple products and quantities; - have multiple financial transactions. A preorder authorization is considered an order. for specific prices in other currencies to take effect. Otherwise, the prices will float based on the daily exchange rate.
An agreement between a seller and a buyer to exchange goods and/or services for money. An order can: - contain multiple products and quantities; - have multiple financial transactions. A preorder authorization is considered an order. for specific prices in other currencies to take effect. Otherwise, the prices will float based on the daily exchange rate.

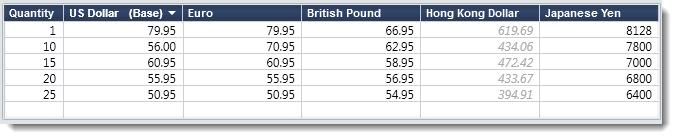
Example
In the price grid below, the base currency is US Dollar and the base price is
A fixed price has not been entered for the Hong Kong Dollar. This price will change daily based on the floating daily exchange rate.

Set Up Volume Pricing
You can use volume pricing to set different prices based on the quantity of the products purchased. To set up volume pricing, follow these steps:
- In the main menu, select Products & Delivery > Products.
- Select and open the product you want to set up volume pricing for.
- Open the Base Price section.
- In the Volume pricing method drop-down list, select a volume pricing model.
- In the price grid, enter product pricing for the first tier of the volume scale.
- In the second row of the price grid, in the Quantity column, enter the starting quantity for the next tier. For example, if the first tier is 1-9 units, the second tier would start with 10.
- In the second row of the price grid, enter prices for that tier in the various currency columns.
- Repeat for every tier in the volume scale.
- Click Accept.
Example
Below is an example of the price grid with volume pricing:
Set Up Subscription Products
Note
Before you use subscription billing in the Cleverbridge platform, this functionality must be activated for your account. For more information, contact Client Experience.
The Cleverbridge subscription commerce platform manages subscriptions in a similar fashion as products and services that have a one-time payment![]() Exchange of money for goods and services in an acceptable amount to the customer where the payment amount has been agreed upon in advance. The customer can only pay with an accepted payment method. Each payment has an individual payment cost. model. All subscriptions must be set up in the Cleverbridge platform, and you have the following options:
Exchange of money for goods and services in an acceptable amount to the customer where the payment amount has been agreed upon in advance. The customer can only pay with an accepted payment method. Each payment has an individual payment cost. model. All subscriptions must be set up in the Cleverbridge platform, and you have the following options:
Set Up a Fixed-Price or Variable-Price Subscription
To set up a fixed-price subscription (that is, a subscription product with a price that does not change through the subscription cycle) or a variable-price subscription (that is, a subscription product with unique prices for different intervals of time) follow these steps:
Step 1: Enable Subscription Billing for the Product
- In the main menu of the Commerce Assistant, click Product & Delivery > Products.
- Select the product for which you want to enable subscription billing.
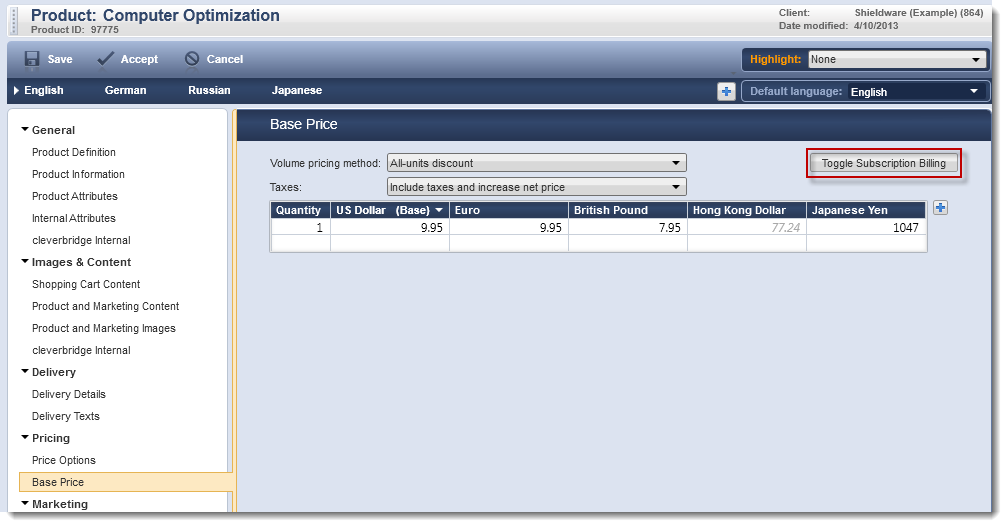
- Click Suggested Retail Price > Base Price.
- Click Toggle Subscription Billing on the top right. Subscription Options appears under Suggested Retail Price.
Step 2: Define General Settings
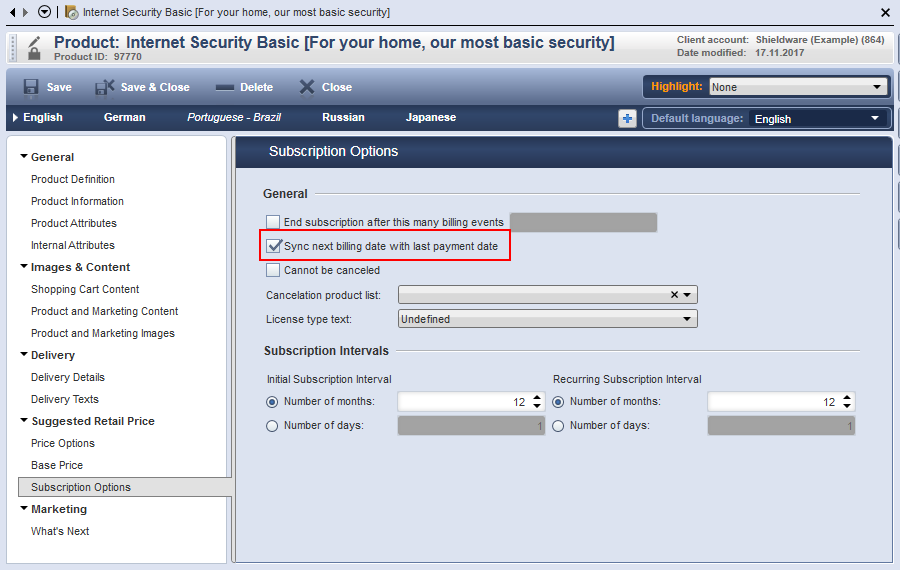
- Click Suggested Retail Price > Subscription Options.
- Choose from the following settings:
| Option | Description |
|---|---|
| End subscription after this many billing events | To end a subscription after a certain number of billing events, check this box and enter the desired number of billing events. The initial payment is not included in this number. |
| Sync next billing date with last payment date |
Syncs the billing date with the date the last payment was received. In the event of late payments, this option automatically recalculates the next billing event date according to the last date a payment was received from the customer. |
| Cannot be canceled |
Prevents the customer from canceling a subscription. |
| Subscription Agreement Type |
ImportantThe product setting Subscription Agreement Type is managed by Client Experience and therefore not visible for clients. Opt-in is the default subscription agreement type; it is suitable for most products. Opt-out and Text only should be used in exceptional cases only because they entail a higher risk of customers completing a subscription without being aware of it. This could lead to increased chargeback Select whether there is a Confirm subscription checkbox on the signup page and whether this checkbox is already checked. You can choose from the following options:
|
| Subscription Confirmation Type |
ImportantThe product setting Subscription Confirmation Type is managed by Client Experience and therefore not visible for clients. Must be confirmed is the default subscription confirmation type; it is suitable for most products. Confirmation is not required and Cannot be confirmed should be used in exceptional cases only because they entail a higher risk of customers completing a subscription without being aware of it. This could lead to increased chargeback, refund, or customer contact rates. Select whether customers must confirm on the signup page that they understand they are signing up for a subscription to the product. You can choose from the following options:
|
| Cancelation product list | Select other subscription products that will be canceled if this product is purchased. The canceled subscriptions are based on the customer’s billing email address. |
| License type text |
If required, select if you want the text to change in the checkout process based on the following types of licenses. These options only change the text and not subscription prices or other factors.
|
Step 3: Select an Initial Subscription Interval
In the Initial Subscription Interval![]() A subscription interval is the time period after which a recurring purchase is renewed and billed. The time period can be set in days, months, or years. One subscription can contain x products, all renewing on the same date.
field, define how much time should pass between the initial payment and the first subscription billing event. This can be set in months or days. After the first billing event, the amount of time set for Recurring Subscription Interval is used for future billing events.
A subscription interval is the time period after which a recurring purchase is renewed and billed. The time period can be set in days, months, or years. One subscription can contain x products, all renewing on the same date.
field, define how much time should pass between the initial payment and the first subscription billing event. This can be set in months or days. After the first billing event, the amount of time set for Recurring Subscription Interval is used for future billing events.
Example
You set the Initial Subscription Interval for 12 months. You set the Recurring Subscription Interval for 1 month.
This means that after the initial payment, the next billing event is one year later. After that billing event, all future billing events are billed monthly.
Step 4: Select a Recurring Subscription Interval
In the Recurring Subscription Interval field, define how much time there should be between billing events. This interval can be set in months or days, such as 1 month, 14 days, 4 months, and so on. Typically, 1, 3, or 12 months are used for monthly, quarterly, or annual billing intervals.
Step 5: Enter Product Pricing
- Click Suggested Retail Price > Base Price.
- Select a Volume Pricing Method from the drop-down list. For further information about Volume Pricing, see Use Volume Pricing.
- Select a Price type for taxation from the drop-down list.
- By default, the Intervals box to the left of the price grid displays 0. Enter unique pricing information in the price grid for interval 0.
Note
Interval 0 is the initial payment price for the product. It will remain the payment price for all subsequent subscription intervals if you do not enter pricing information for another interval.
- If you are setting up a fixed-price subscription product that does not change throughout the subscription cycle, proceed to set up the delivery details. If you are setting up a variable-price subscription product with unique prices for different intervals of time, continue to point 6.
Important
We do not recommend setting up identical prices for intervals of different lengths.
- Select another interval using the drop-down list, and click Add. Interval 1, for example, is the first billing event after the initial payment.
- Enter unique pricing information in the price grid for the interval.
- Repeat points 6 and 7 for any additional intervals.
Example
The initial payment price is $100 for the first year. After the first year, the customer pays a quarterly price of $20. You set the quarterly price as future intervals, starting with Interval 1.
For detailed information about setting up pricing, see Products ✱.
Step 6: Set Up Delivery Details
- Click Delivery > Delivery Details.
- Select a Delivery type for your product.
- Configure the Options for the Delivery type you chose.
- Select a Subscription Billing Option.
- To add additional delivery options for your subscription product, select Use different delivery details and click Add Delivery in the action bar.
For detailed information about setting up delivery details, see Products ✱.
Combine a Regular Product with a Subscription
You can sell a regular product with an additional subscription contract, such as a maintenance plan or other additional service.
- Set up the regular product.
- Set up the subscription product.
- Set up a cross-sell for the subscription product to combine it with the regular product. A cross-sell is a type of recommendation.
For more information on recommendations, see Add a Recommendation.
Set Up a Free Promotional Period for a Subscription
You can offer customers a free trial period, such as 30 days. If the customer does not cancel within that time frame, the free trial subscription automatically converts to a paid subscription at the end of that period. A free trial period is set either in the product itself or by using a coupon code. For more information, see About Free Trials.
Note
Additional fees apply to free trial transactions. For more information, contact Client Experience.
Tip
You can activate the pre-authorization of the customer's credit card for free trials. This setting is configurable on a client account and product level. For more information, contact Client Experience.
Set Up the Free Trial Period in the Product
You can set up a free trial on the product level by opening the Products section of the Subscription Commerce Manager (SCM) and the Products & Delivery section of the Commerce Assistant (CA). Depending on your tool of choice, do as follows:
Free Trial Setup in the SCM
- In the Products section in the main menu of the SCM, select the recurring product you want to set up a free trial period for.
- In the Pricing sub-section, select Start with free trial period and define the length of the free trial under Length of Initial Billing Interval. The price for Billing Interval 0 shows 0 automatically in the Billing Schedule.
- Define the length of subsequent billing intervals under Length of Recurring Billing Interval.
- Select Billing Interval 1 in the Billing Schedule and enter unique pricing information in the price grid for Billing Interval 1. This is the amount the customer will pay when the free trial period ends.
Example
You want to set up a free trial period of 30 days for your product. In this case, you select days and enter 30 under Length of Initial Billing Interval.
Note
If you don't define pricing information for Billing Interval 1, then Billing Interval 0 (as the initial price for the product) will remain the price for all subsequent subscription intervals.
You are now ready to offer customers a free trial period for the recurring product.
Free Trial Setup in the CA
- In the main menu of the Commerce Assistant, select Product & Delivery > Products.
- Select the product you want to set up a free trial period for.
- Click Suggested Retail Price > Base Price.
- If subscription billing hasn't been enabled for the product, click Toggle Subscription Billing on the top right. Subscription Options appears under Suggested Retail Price.
- Click Suggested Retail Price > Subscription Options and define the length of the free trial under Initial Subscription Interval.
Example
You want to set up a free trial period of 30 days for your product. In this case, you select Number of days and enter 30 under Initial Subscription Interval.
- Click Suggested Retail Price > Base Price and enter 0 as the price for Interval 0.
Note
Interval 0 is the initial price for the product. It will remain the price for all subsequent subscription intervals if you do not enter pricing information for another interval.
- Select Interval 1 from the drop-down list, and click Add.
- Enter unique pricing information in the price grid for the Interval 1. This is the amount the customer will pay when the free trial period ends.
You are now ready to offer customers a free trial period for the subscription product.
Set Up the Free Trial Period Using a Coupon Code
You can set up a free trial via coupon code by opening the Campaigns section of the Subscription Commerce Manager (SCM) and the Marketing section of the Commerce Assistant (CA). Depending on your tool of choice, do as follows:
Free Trial Setup via Coupon Code in the SCM
- In the Campaigns section in the main menu of the SCM, select Promotions > Add Promotion.
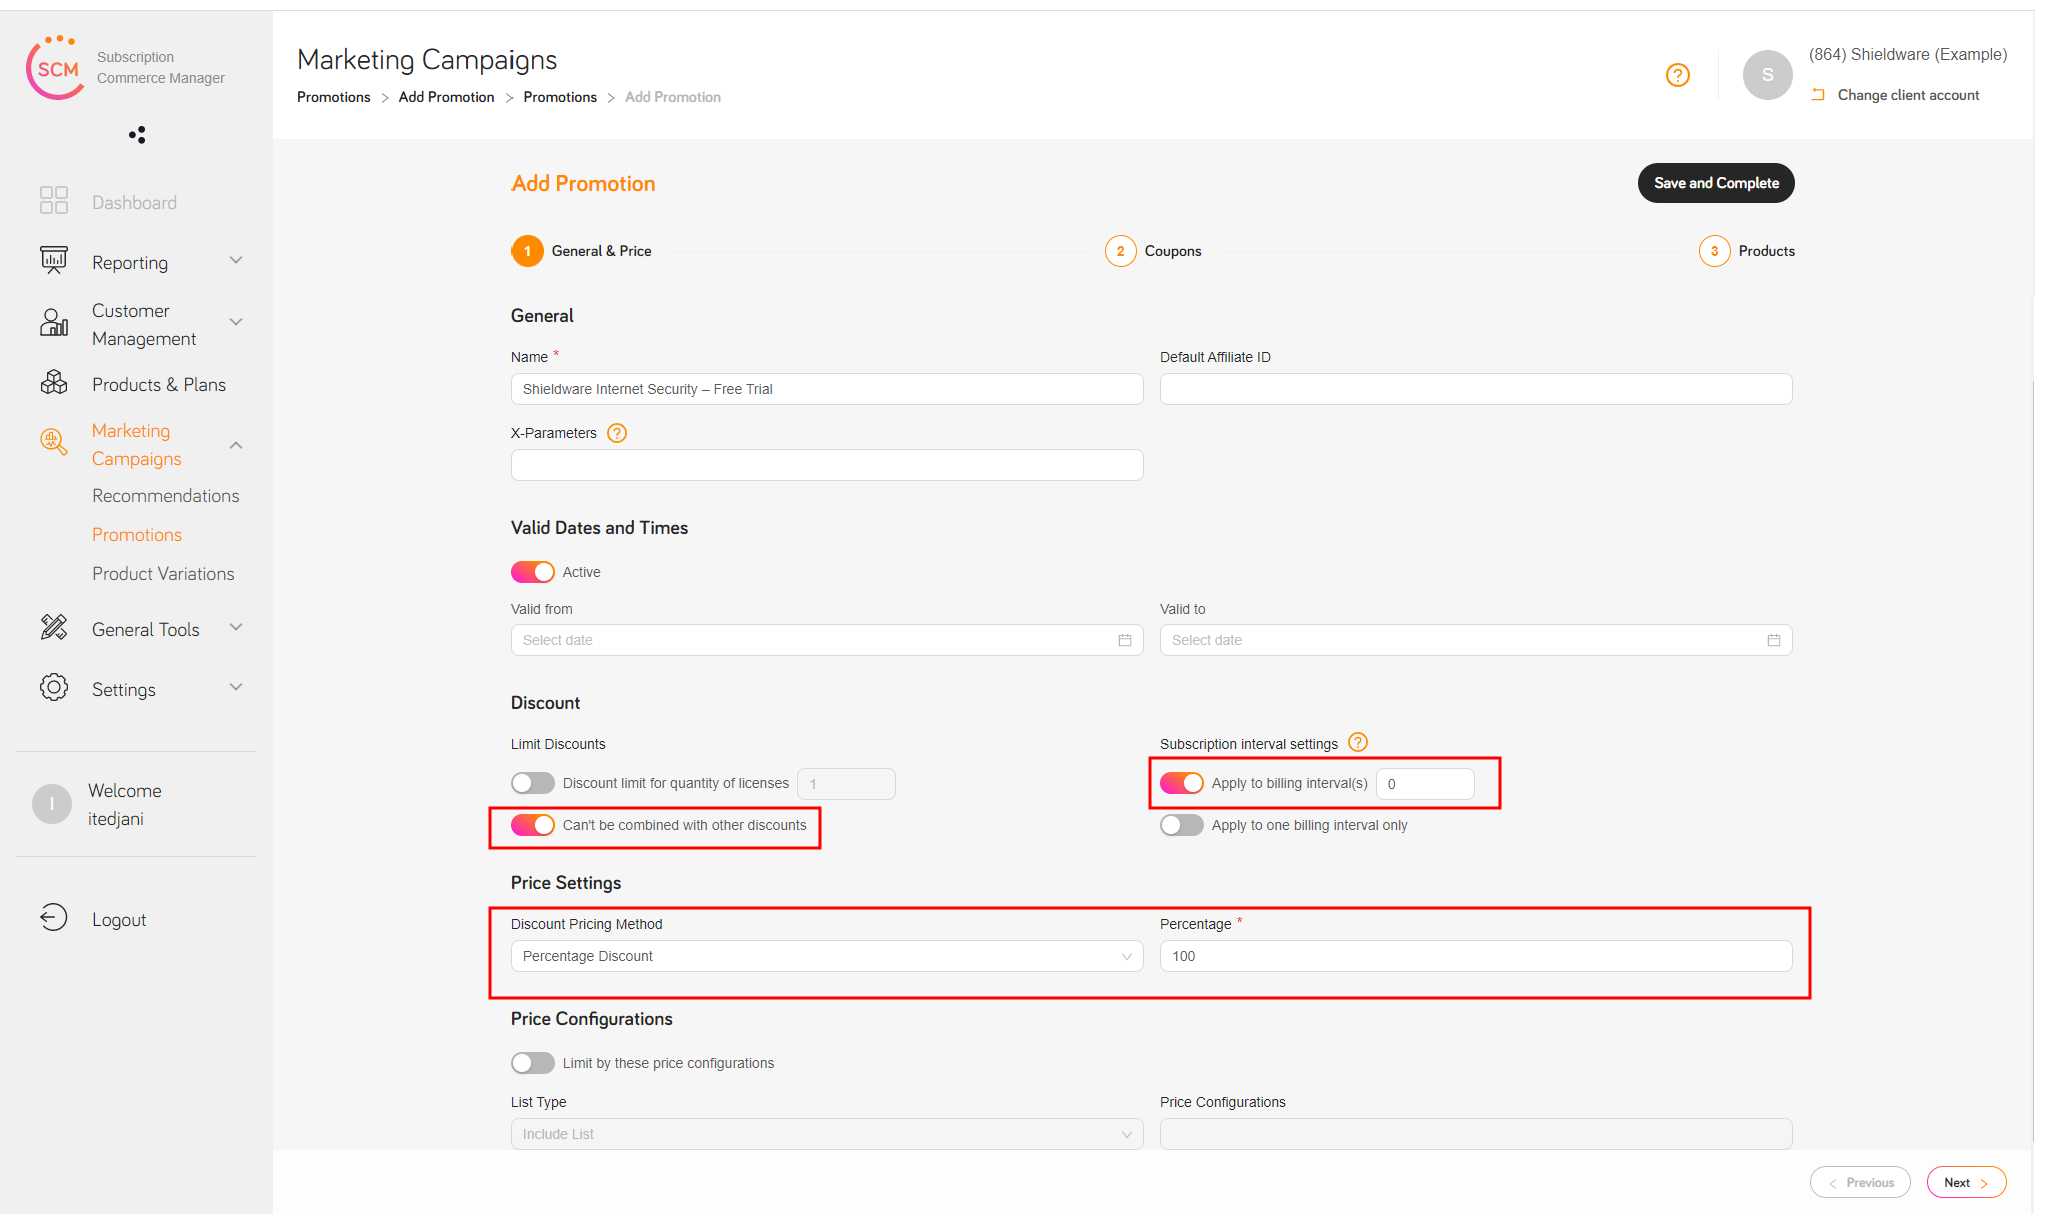
- In the General & Price section, enter a name for the free trial promotion, for example "Shieldware Internet Security – Free Trial".
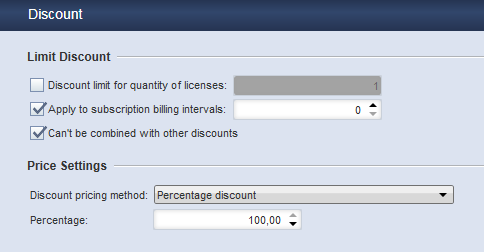
- In the Discount sub-section, set up the discount as shown on the screenshot below. For more information on the individual options, see Set Up Discount for Promotion under Add a Promotion.
- Select the Coupons section and generate a coupon code:
- Click Add Coupons and select Generate Coupons:
- Enter information about how the coupon code should be created.
- Click Submit. The coupon code is added.
- In the Products section, click Select Product and choose the subscription product you want to set up a free trial period for. For more information on how to do this, see Add Products to a Promotion.
- Click Submit, then Save and Complete in the upper left corner of the Promotions section.
You are now ready to offer customers a free trial period for the recurring product.
Important
When creating the link to your checkout process, you must add the coupon code and hide the coupon input field. For more information on how to do this, see List of Checkout Process Parameters > Coupon Settings.
Free Trial Setup via Coupon Code in the CA
- In the main menu of the Commerce Assistant, select Marketing > Add Promotion. The Promotion portal opens.
- In the General section, enter a name for the free trial promotion, for example "Shieldware Internet Security – Free Trial".
- Select the Discount section and set up the discount as shown on the screenshot below. For more information on the individual options, see Set Up Discount for Promotion under Add a Promotion.
- Select the Coupons section and generate a coupon code:
- Click Generate. The Generate Coupons window opens.
- Enter information about how the coupon code should be created.
- Click OK. The coupon code is added.
- In the Products section, specify the subscription product you want to set up a free trial period for. For more information on how to do this, see Add Products to a Promotion.
- Click Save in the upper left corner of the Promotion portal.
You are now ready to offer customers a free trial period for the subscription product.
Important
When creating the link to your checkout process, you must add the coupon code and hide the coupon input field. For more information on how to do this, see List of Checkout Process Parameters > Coupon Settings.
Combine a Subscription with a Promotional Discount
You can combine subscriptions with promotional discounts. This means you can control how the promotional campaign is billed. You can decide whether the discount is:
- Only for the initial purchase
- For a limited number of billing events
Discount Only for Initial Purchase
To provide a discount for the initial purchase only:
- In the main menu of the Commerce Assistant, click Marketing > Promotions.
- Select the promotion you want to offer for the initial purchase.
- Click Discount.
- Select Apply to subscription billing intervals.
- Enter 0. Only the initial purchase is discounted. Later billing events are full price.
Discount for Limited Number of Billing Events
To provide a discount for a certain number of billing events:
- In the main menu of the Commerce Assistant, click Marketing > Promotions.
- Select the promotion you want to offer for the initial purchase.
- Click Discount.
- Select Apply to subscription billing intervals.
- In the toggle to the right, enter the number of billing events for which the discount applies. Later billing events are full price.
Important
There are two points which you must be aware of when setting up subscriptions in the Cleverbridge platform:
- Essential Settings: The following are some essential settings that you must configure:
- Sync next billing date with last payment date – This box must be selected. In case of delinquent payments, the last payment date will be used to keep the intervals between billing events in sync.
- Recurring Subscription Interval – You must define how much time there should be between billing events.
- Initial Subscription Interval – You must define the number of months or days until the first billing event that follows the initial purchase. After that, the amount of time set for the Recurring Subscription Interval is used for future billing events.
- Customer Checkboxes: By default, customers who purchase a subscription product or service will see a checkbox to confirm that they agree to pay the renewal charges. Customers must select this box before they can complete their purchase (see the example below). If you have questions about these confirmation options, contact Client Experience.


For more information about the set-up options in the Cleverbridge platform, see Set Up Subscription Products.
To set up volume pricing, see Use Volume Pricing. To set up subscription pricing, see Set Up Subscription Products.