Manage Users
In our web admin tool, you can manage users within your account through the User Portal. This feature is essential for onboarding new users and maintaining access needs, providing an efficient way to manage users directly within the platform.
Our User Portal offers you a range of actions that provide you with flexibility and control over your user base:
- View users: Access and view a comprehensive list of all users in your account, allowing you to monitor and manage user activity and details efficiently.
- Add users: Create new user accounts for team members or clients, ensuring they have access to necessary features and resources.
- Generate test credit cards: Provide test credit card information for development and testing purposes within the web admin tool.
- Edit users: Update user details, roles, and permissions to maintain accurate and up-to-date user information.
- Change passwords: Manage user passwords efficiently, allowing you to reset or update credentials as needed.
- Delete users: Remove user accounts that are no longer needed, helping keep the system organized and secure.
- Make a copy of users: Duplicate user profiles quickly to create new accounts with similar settings, saving time and maintaining consistency.
View Users
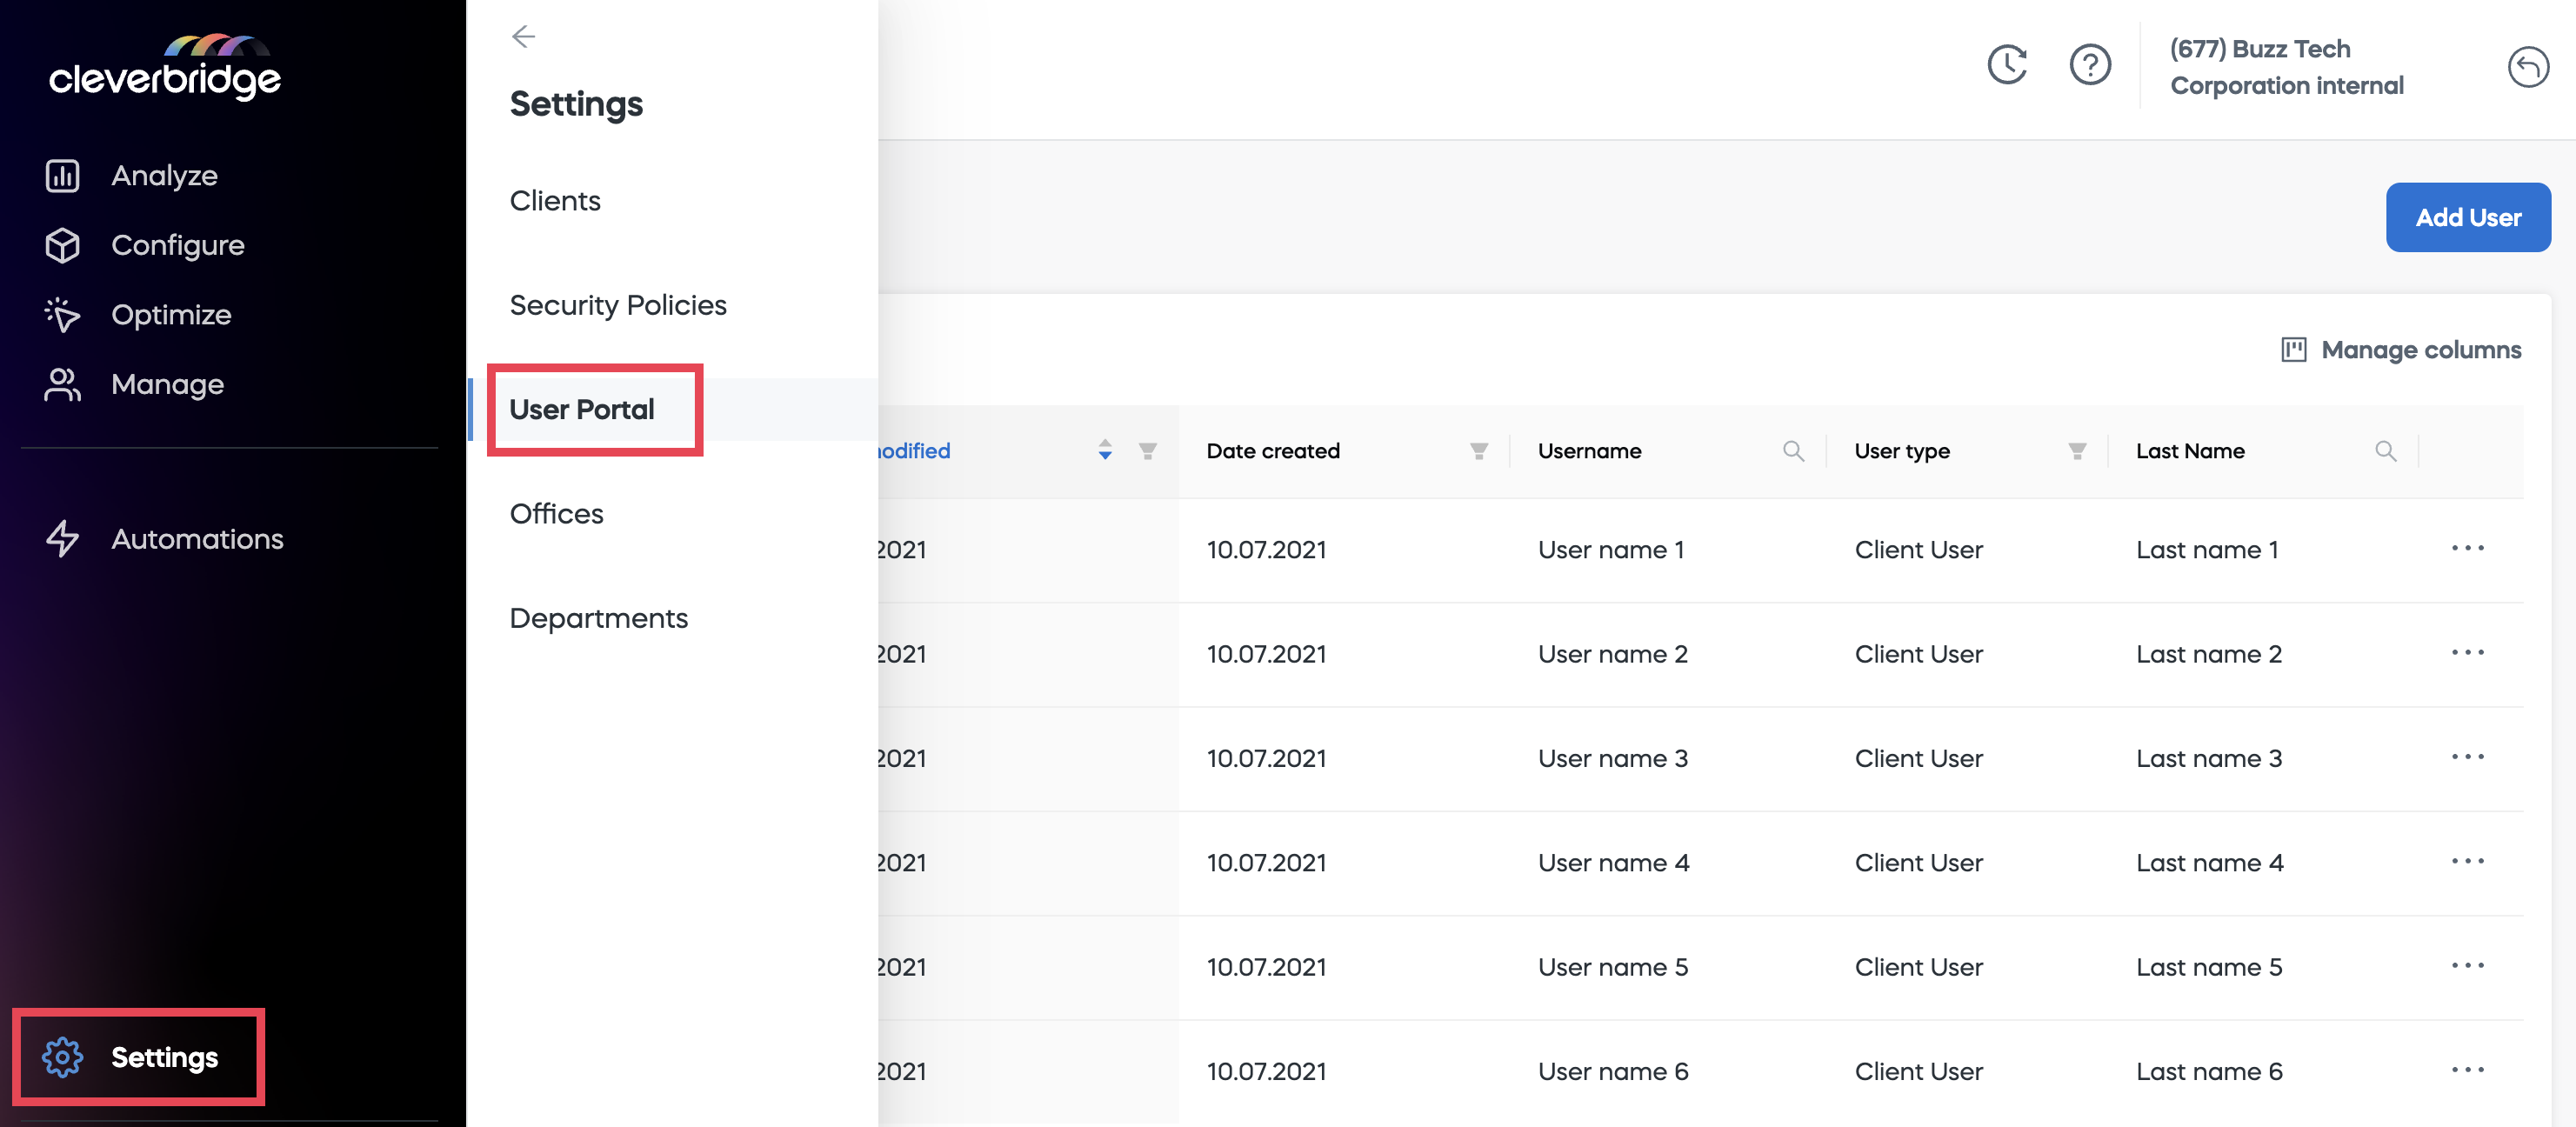
In the web admin tool, go to Settings > Users. On the User Portal home screen, you can view a list of users in a table.
To adjust the displayed data:
Add Users
Follow these steps to add a new user:
- In the web admin tool, go to Settings > Users.
- Click on Add Client User. You will be directed through several screens to create the user.
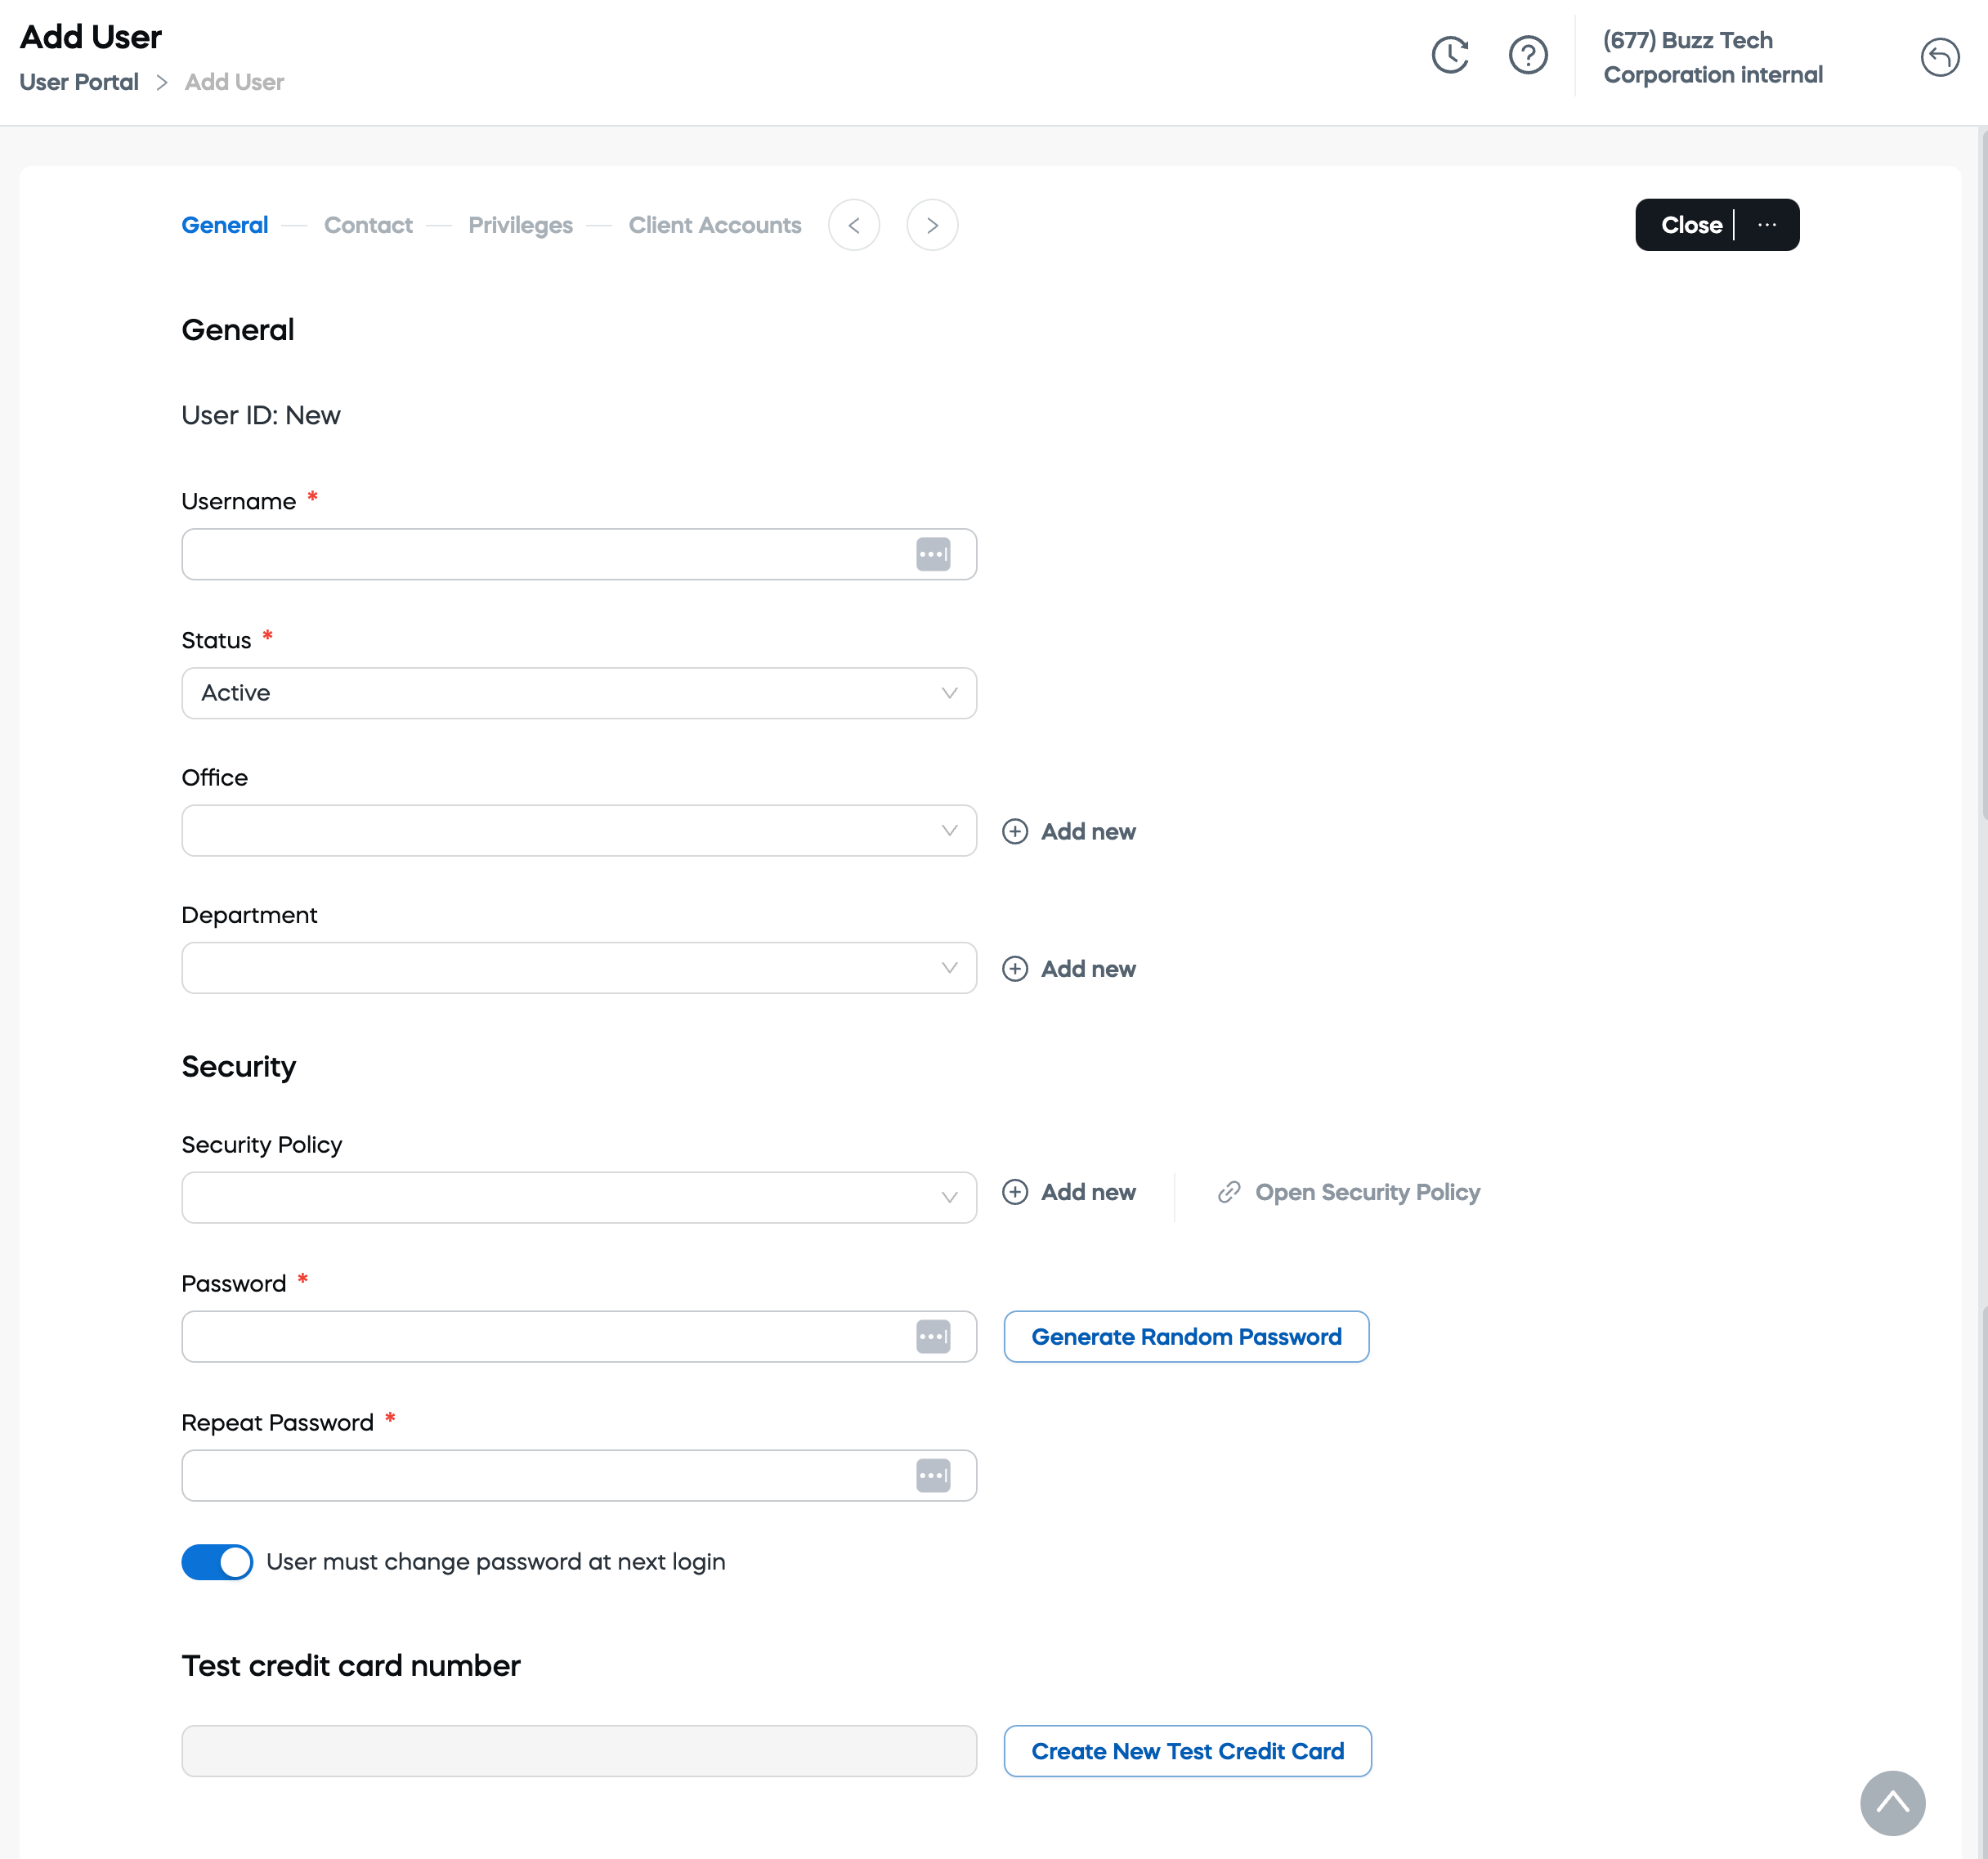
General Tab
- User ID: The new user will be automatically assigned a user ID.
- Username: Specify the username for the user.
- Status: Set the user's status (for example, active or inactive).
- Office: Select the office location for the user or add a new office if needed.
Security
- Security Policy: Click the drop-down list and all the policies (if any) available for your company will be displayed. Select the policy from the drop-down list.
- Password: Enter the user’s password. Alternatively, you can generate a random password using the Generate Random Password option. This is especially useful when creating accounts for colleagues, as the password will be temporary. The user will be prompted to change it the first time they log in, saving time during the account creation process.
- Repeat Password: Confirm the user’s password.
- User must change password at next login: Enable this option if you want the user to change their password at their next login.
Test credit card number
Provide a test credit card number for the user if applicable. Note that generating a test credit card requires specific user permissions. If the button is disabled, it means the user does not have the necessary rights to generate a test credit card.Make sure all required fields are filled in to proceed to the next tab.
Contact Tab
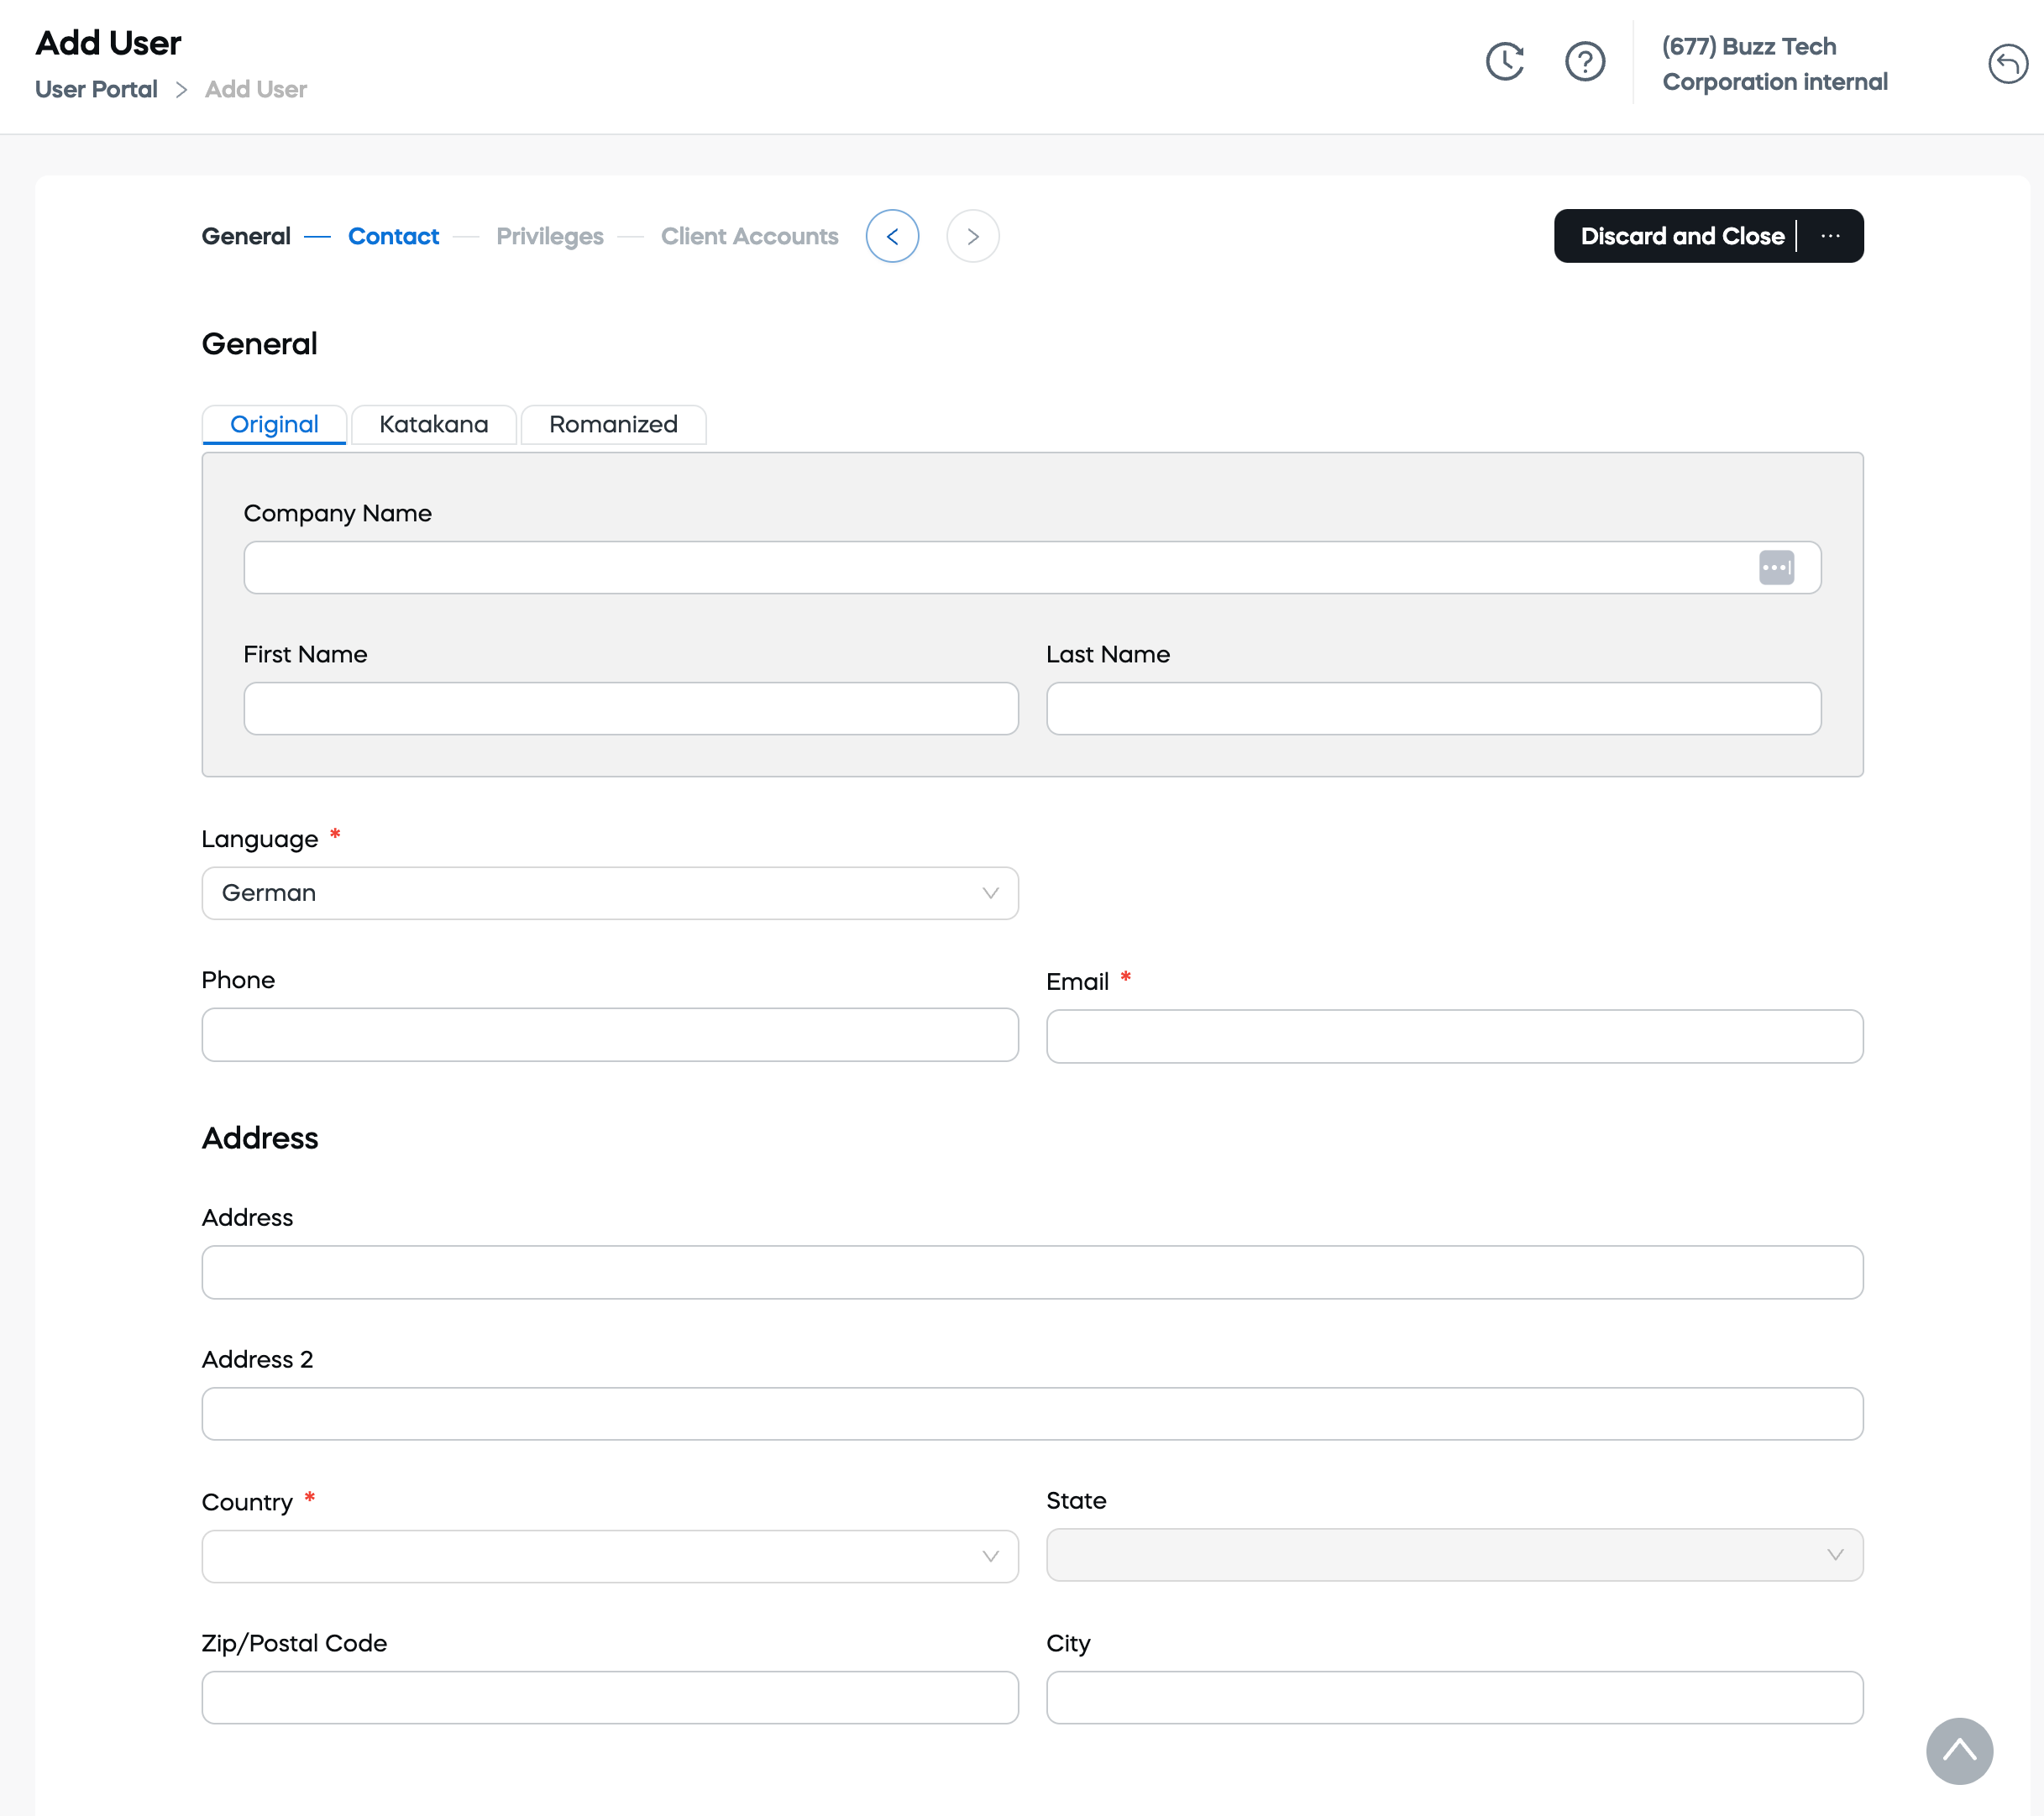
- Original: Enter the original contact’s name.
- Katakana: Enter the contact’s name in Katakana (if applicable).
- Romanized: Enter the Romanized version of the contact’s name (if applicable).
- Company Name: Specify the company name associated with the user.
- First Name: Enter the user’s first name.
- Last Name: Enter the user’s last name.
- Language: Select the user’s preferred language.
- Phone: Enter the user’s phone number.
- Email: Provide the user’s email address.
- Address: Enter the user’s address (line 1).
- Address 2: Enter additional address information (line 2), if applicable.
- Country: Select the user’s country from the drop-down menu.
- State: Select the state or region for the user.
- Zip/Postal Code: Enter the user’s zip or postal code.
- City: Specify the city where the user is located.
Make sure all required fields are filled in accurately to proceed to the next screen.
Privileges Tab
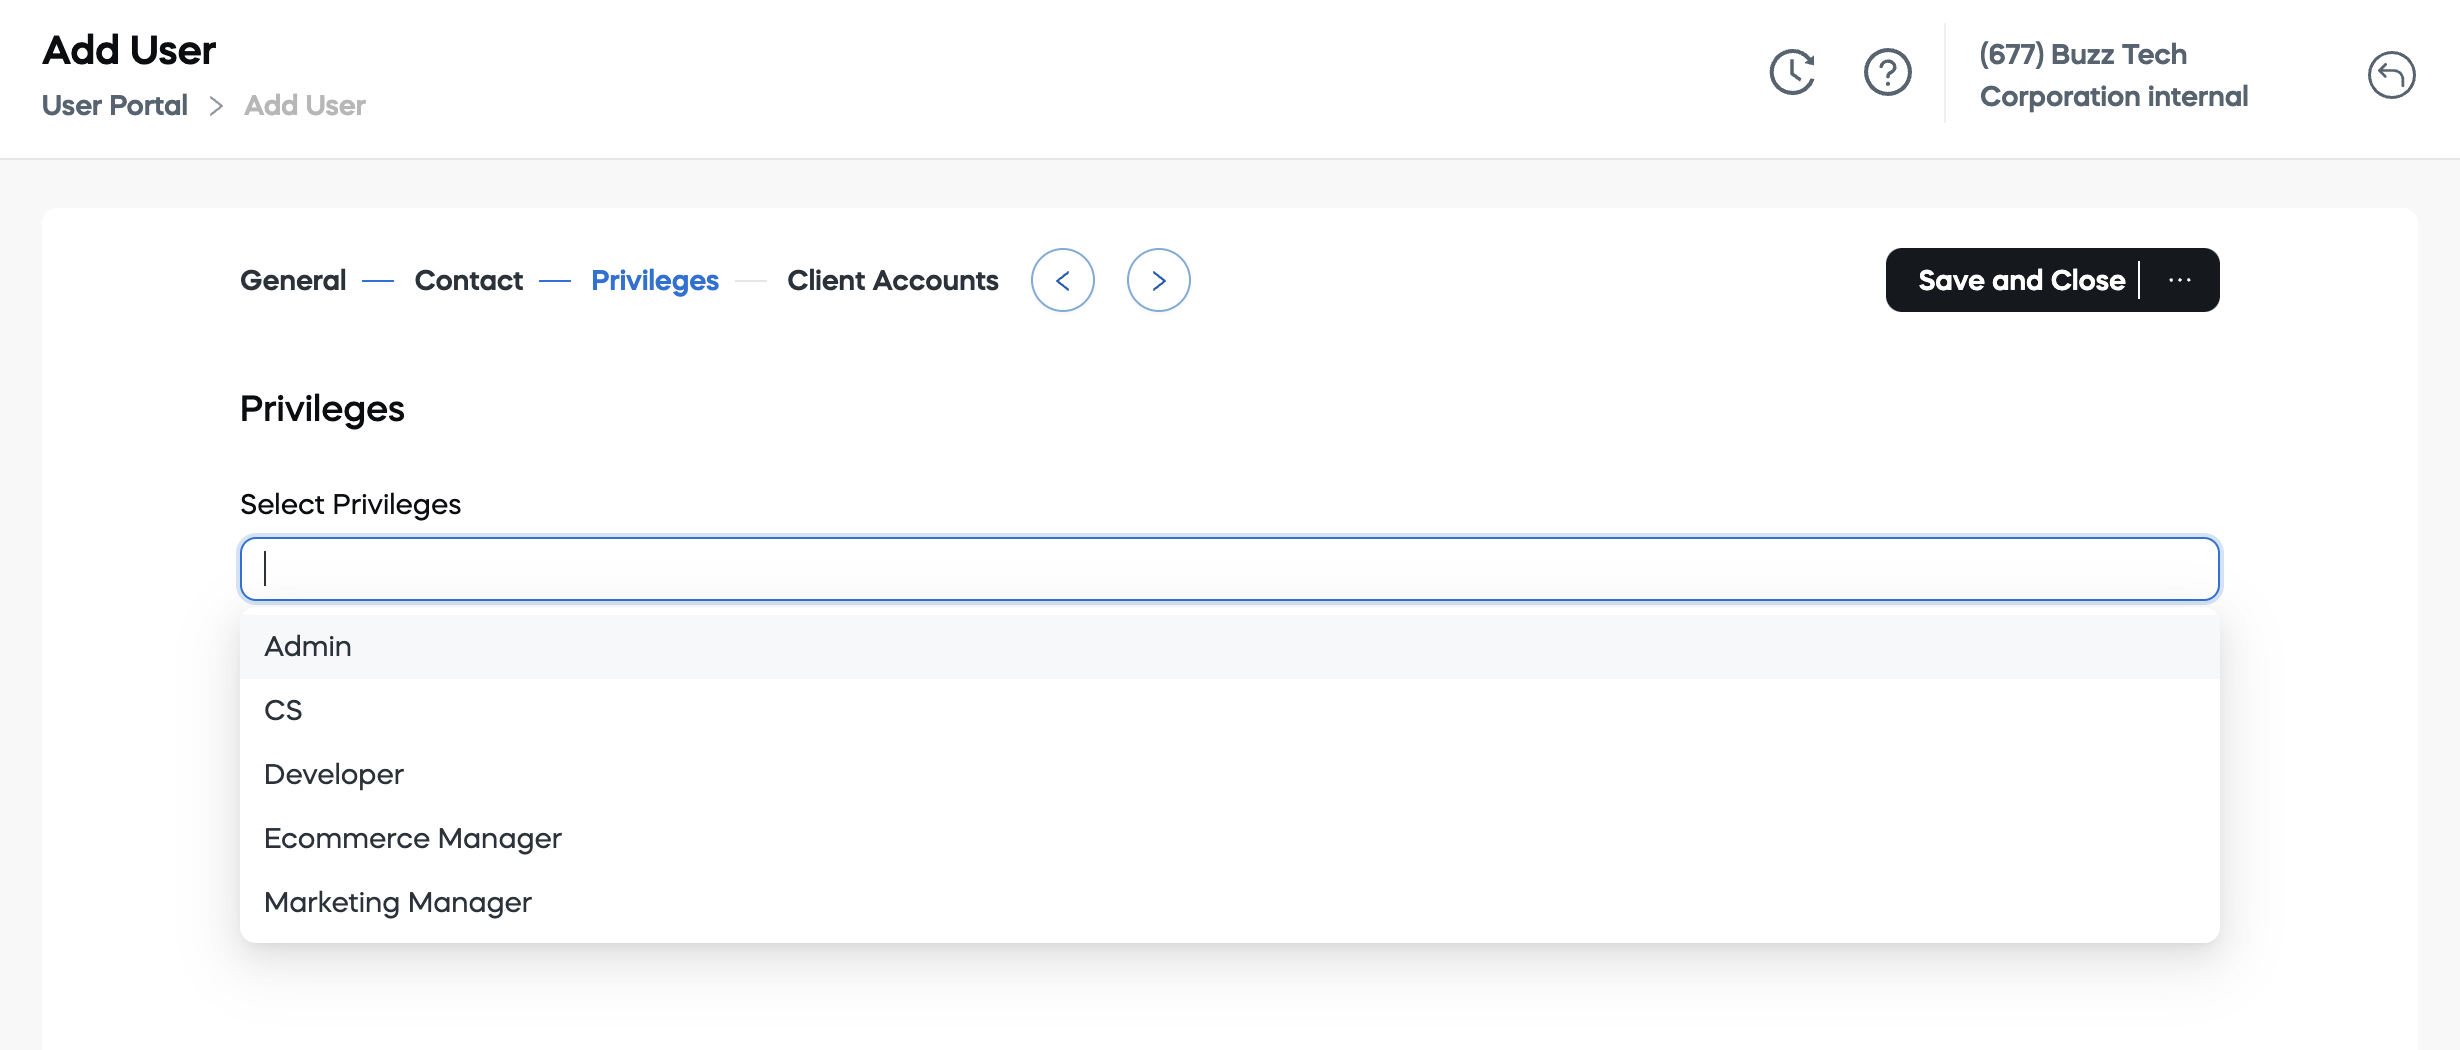
- Privileges: Choose the appropriate role for the user from the drop-down menu:
- Admin
- CS
- Developer
- Ecommerce Manager
- Marketing Manager
Client Accounts Tab
Note
This step is only available for multi-client organizations—typically large companies with multiple associated client accounts in the admin panel. If the company is a single-client organization, this step will not be available.
- Client Accounts: Choose the relevant client account that the user will have access to.
- Click Save and Close.
Alternatively, you can select one of the following options from the button drop-down:
- Save and Stay: Save the current information and remain on the screen.
- Discard and Close: Cancel the changes and close the screen.
Edit Users
Follow these steps to edit a user:
- In the web admin tool, go to Settings > Users. You will see a list of users.
- Find the user you would like to edit by using the search or filtering options in the table's header.
- Click the ... menu to the right of the user and select Edit.

You will now be able to edit all the details available in the Add Users section, including fields on the General and Contact tabs. Additionally, you have the option to generate a new password for the user, allowing you to reset their credentials if necessary. For more information on each field, refer to the instructions in the Add User section.
Delete Users
Follow these steps to delete a user:
- In the web admin tool, go to Settings > Users. You will see a list of users.
- Find the user you would like to delete by using the search or filtering options in the table's header.
- Click the ... menu to the right of the user and select Delete User.

A verification prompt will appear asking, "Delete the item ...?". Click OK to confirm and delete the user.
Make a Copy of a User
Follow these steps to make a copy of an existing user:
- In the web admin tool, go to Settings > Users. You will see a list of users.
- Find the user you would like to copy by using the search or filtering options in the table's header.
- Click the ... menu to the right of the user and select Create Copy.

The system will duplicate the selected user’s profile, allowing you to adjust any necessary details, such as username or password, before saving the new user. This feature helps save time by replicating user settings from an existing account.
For more information on each field, refer to the instructions in the Add Users section.
Note
You can also manage users in Commerce Assistant. Please refer to the Manage a User topic in the Commerce Assistant guide for more details.


