A promotion is a price discount, such as a specified percentage or amount of money off of the regular product price. A promotion can also be a product offering that deviates from your standard product offerings. It gives customers an incentive to buy a product. Promotions boost sales or reward loyal customers.
Example
Examples of promotions are:
- Freebies
- Limited-time offers
- Holiday specials
Promotions can be applied in two ways:
- A customer
 An individual or business purchasing your product or service by placing an order through Cleverbridge. The customer is the end user of this product, as they are not allowed to resell the purchased products or services.
A customer is unique per client. If a customer purchases products or services from two different clients, there are 2 separate records of said customer. enters a coupon code during the checkout process.
An individual or business purchasing your product or service by placing an order through Cleverbridge. The customer is the end user of this product, as they are not allowed to resell the purchased products or services.
A customer is unique per client. If a customer purchases products or services from two different clients, there are 2 separate records of said customer. enters a coupon code during the checkout process. - The coupon code is passed in the URL, automatically applying the discount.
See Implement a Promotion for Customers.
Open a Promotion
- To open a promotion, select Marketing > Promotions in the main menu of the Commerce Assistant (CA). The Promotions search opens.
- Search for the promotion you want to view.
- Select the promotion line item in the search results.
- Click Open. The promotion opens.
Tip
Once opened, you can set up a discount, coupons, specify additional products, and select price configurations for the promotion. For more information, see the Discount, Coupons, Products, and Price Configurations sections right below in Add a Promotion.
Note
You can use our web admin tool to manage promotions. For more information, see Optimize > Promotions.
Add a Promotion
You can use the Promotion portal in the Commerce Assistant (CA) to add, view, and edit a promotion. To add a promotion, enter information in the following sections:
General
You can use the General section of the Promotion portal to enter settings that define the overall characteristics of the promotion. Enter information in the following fields:
Name
Enter a unique name for the promotion.
Tip
To make it easier to find the promotion later, name it with a structure that can be easily found and tells you what it is. A good naming convention can include
- the type of promotion you are naming
- the product name associated with it
- the price, country, or other relevant information
An example that follows good naming conventions could look like this:
Email – Internet Security Basic – Germany – GIFTFORYOU
For more information, see Best Practice: Conventions to Structure and Name your Data.
Active
The Active option determines whether or not a promotion is available for use.
Valid From and Valid To
The Valid from and Valid to options determine when a promotion is available for use. If you don't enter valid dates and times, the promotion is always available when active. This setting is based on the date and time settings of your computer.
-
- Enter a date and time for the duration of the promotion.
Default Affiliate ID
To credit an affiliate![]() An individual or a company that markets a product to potential customers. The Affiliate receives a commission on a specific action (also called event: e.g., sale, lead, click, visit etc.) previously agreed upon with you, the advertiser. Each action is tracked via a unique tracking link from Partnerize.
An affiliate is also called a publisher. for every purchase
An individual or a company that markets a product to potential customers. The Affiliate receives a commission on a specific action (also called event: e.g., sale, lead, click, visit etc.) previously agreed upon with you, the advertiser. Each action is tracked via a unique tracking link from Partnerize.
An affiliate is also called a publisher. for every purchase![]() An order made by a customer and the records associated with it. made with a coupon from this promotion, enter that affiliate’s ID number. Use the affiliate ID number for affiliates who distribute coupons through media, such as mailings or print media.
An order made by a customer and the records associated with it. made with a coupon from this promotion, enter that affiliate’s ID number. Use the affiliate ID number for affiliates who distribute coupons through media, such as mailings or print media.
X-parameters
Note
This setting overrides any x-parameters passed to the order![]() An agreement between a seller and a buyer to exchange goods and/or services for money. An order can: - contain multiple products and quantities; - have multiple financial transactions. A preorder authorization is considered an order. process or previously set in a cookie.
An agreement between a seller and a buyer to exchange goods and/or services for money. An order can: - contain multiple products and quantities; - have multiple financial transactions. A preorder authorization is considered an order. process or previously set in a cookie.
A primary use case for the X-parameters field is to collect information that allows Cleverbridge to correctly credit the Partnerize publishers who distribute promotional coupon codes through mailings, print media, web forums, etc. To utilize the X-Parameters field for this use case, enter a key-value pair in the field that has the following format:
x-publisher-id=<partnerize publisher ID>
The <partnerize publisher ID> can also remain empty. To connect multiple X-Parameters, use &.
Example
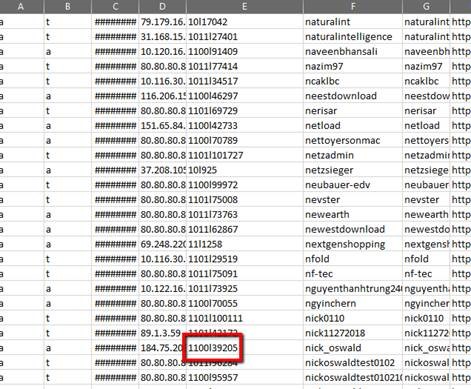
x-publisher-id=130l392
Note
An active integration with a Partnerize campaign is required to use this field.
Note
To find the Partnerize Publisher ID for a publisher in your Partnerize account, complete the following steps:
a. Click the Partners tab in the main menu of Partnerize.

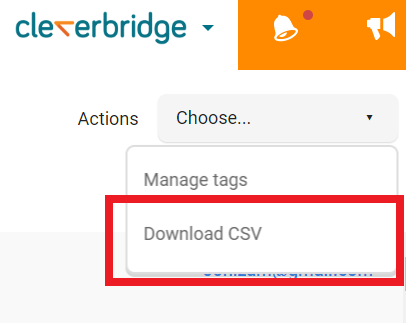
b. Select Status > Approved as a filter in the left column.
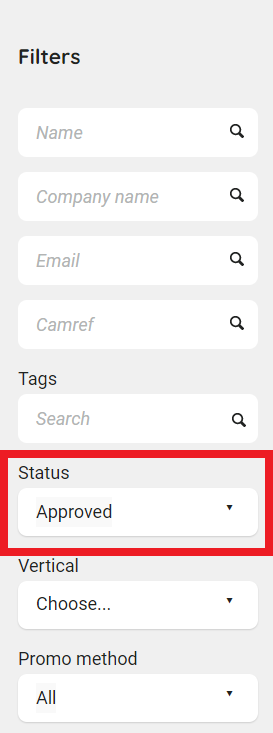
c. Select Download CSV in the Actions drop-down list. A CSV file is downloaded.
d. Open the CSV file and find the publisher(s) you would like to credit. In column E, you can find their Partnerize Publisher ID.
Set Up Discount for Promotion
Use the Discount section to limit the discount and to specify a pricing model. Complete the following:
The following options are available for limiting the discount:
The Discount limit for quantity of licenses option limits the quantity of units that can be discounted when a customer purchases multiple quantities of the same product. Select the maximum number of units that can be discounted.
Example
The quantity limit is set to 2. A customer purchases 5 units of the product. The discount is applied to the first 2 units of the product, and the remaining 3 are full price.
The Can't be combined with other discounts option prevents other discounts in the Cleverbridge platform, such as from price configurations, from being combined with this discount. This is valid in situations where partners may have other discounts in the platform and you do not wish those discounts to be applied in addition to this one.
Warning
A dynamic discount created in the Link Generator will also work in addition to this discount, even if you select the Can't be combined with other discounts option. To avoid this scenario, in the Link Generator of the Marketing section, deselect the Enable coupon code entry field in cart option.
Select this option to prevent partners from getting another discount after this discount is applied.
Don’t select this option if it’s okay for partners to get other discounts in addition to this discount. This discount is deducted first, and then additional discounts are deducted.
The Apply to one subscription billing interval only option applies the discount to a maximum of one billing interval per subscription.
Example
A subscription product is billed monthly. You create a promotion for the subscription product and select the Apply to one subscription billing interval only check box. The discount is applied to the initial billing event. Starting with the second rebilling event, the customer pays the full price for the monthly subscription.
Note
It is only possible to select one of the following in the Discount section:
- Apply to one subscription billing interval only under Limit Discount
- Apply to subscription billing intervals under Subscription Interval A subscription interval is the time period after which a recurring purchase is renewed and billed. The time period can be set in days, months, or years. One subscription can contain x products, all renewing on the same date.
Settings
The Apply to billing interval(s) option applies the discount to subscription-billed products. Select a number to control how many billing events have the discount. Use 0 to discount only the initial purchase, which means later billing events are full price. Use numbers greater than 0 to specify how many billing events are discounted. If you
Example
A subscription product is billed monthly. You create a promotion for the first 6 months free. The Apply to billing interval(s) is set to 5. The discount is applied to the initial billing event plus the next 5 subscription rebilling events. Starting with the 7th rebilling event, the customer pays the full price for the monthly subscription.
Note
It is only possible to select one of the following in the Discount section:
- Apply to one subscription billing interval only under Limit Discount
- Apply to subscription billing intervals under Subscription Interval Settings
The Apply to one subscription billing interval only option applies the discount to a maximum of one billing interval per subscription.
Example
A subscription product is billed monthly. You create a promotion for the subscription product and select the Apply to one subscription billing interval only check box. The discount is applied to the initial billing event. Starting with the second rebilling event, the customer pays the full price for the monthly subscription.
Note
It is only possible to select one of the following in the Discount section:
- Apply to one subscription billing interval only under Limit Discount
- Apply to subscription billing intervals under Subscription Interval Settings
The Price Settings section determines how the discount is priced. To set up the price settings for your discount, you must first select a Discount pricing method. The
The Percentage Discount option allows you to set a specific percentage which will be subtracted from the price of a product. To offer a percentage discount, do the following:
- Select Percentage Discount from the drop-down menu. The Percentage field is displayed.
- Select the percentage you want to offer as a discount.
- Click Save.
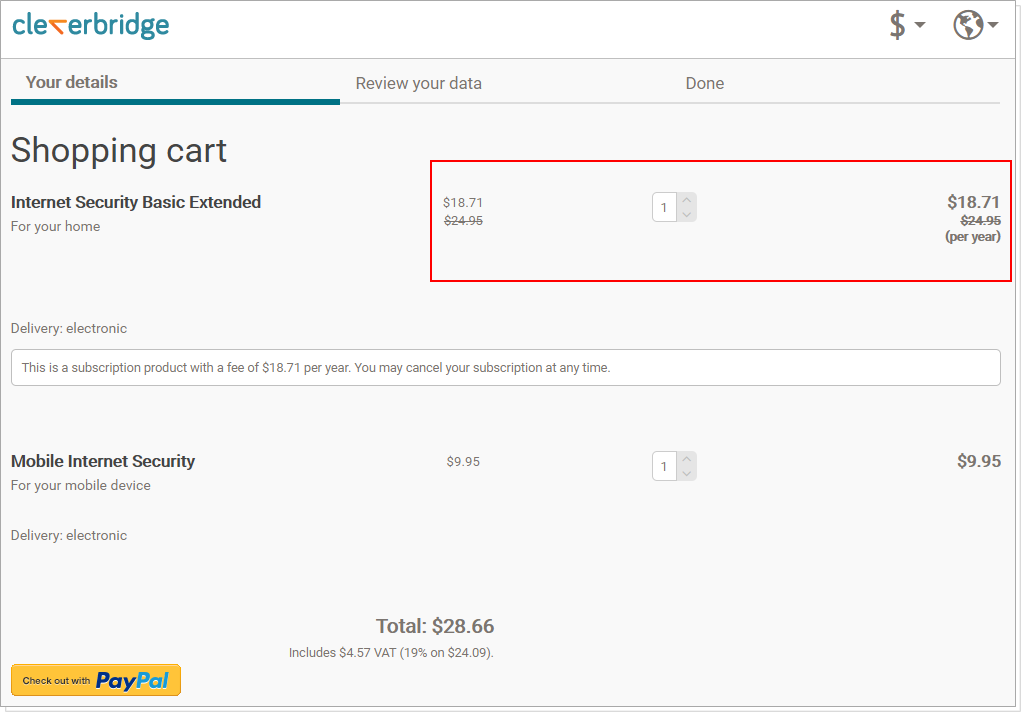
Example
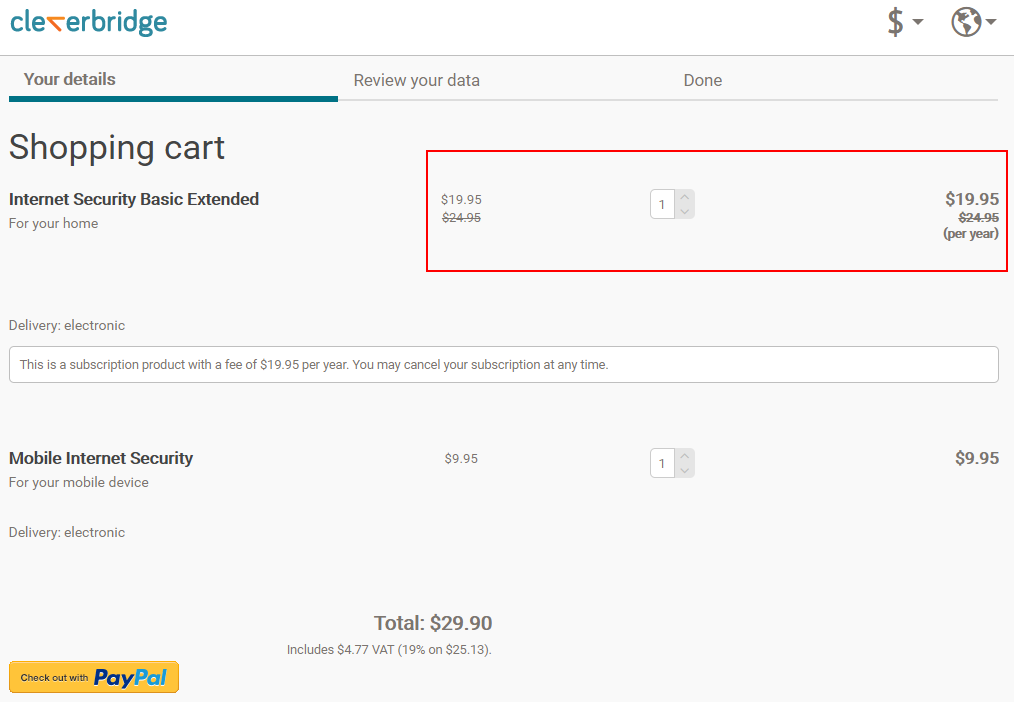
In the cart below, Internet Security Basic Extended has a promotion with a percentage discount of 25% off. The promotion doesn't apply to the other product in the cart, Mobile Internet Security. Note that the discount is only taken from Internet Security Basic Extended, and not the total order price.
The Percentage Discount (Volume Scale) option allows you to set a specific percentage which will be subtracted from the price of a product. This is useful for products that are sold in multiple quantities. To offer a percentage discount for a product purchased in volume, do the following:
- Select Percentage Discount (Volume Scale) from the drop-down menu. A grid with quantities and percentages displays.
- In the Quantity column, enter the volume scale, with each row representing the next tier of the scale. For more information, see Use Volume Pricing.
- In the Percentage column, enter the percentage discount for each row of the volume scale. For more information, see Use Volume Pricing.
- Click Save.
The Absolute Discount option allows you to set a specific amount which will be subtracted from the price of a product. To offer an absolute discount, do the following:
- Select the Absolute Discount option from the drop-down menu.
- Select and enter the appropriate information in the following fields:
- Price type for taxation
- a price grid
- Click Save.
Warning
Be careful with the absolute discount option if it applies to more than one product and the products have different prices. It's possible to discount the prices more than you intended.
You can turn off this warning in the Setup, Options window by deselecting the Show warning when discount exceeds product price option.
Example
In the cart below, Internet Security Basic Extended has a promotion with an absolute discount of $5 off of the original product price.
The Absolute Discount (Volume Scale) option allows you to set a specific amount which will be subtracted from the price of a product. This is useful for products that are sold in multiple quantities. To offer an absolute discount for a product purchased in volume, do the following:
- Select the Absolute Discount (Volume Scale) option from the drop-down menu.
- Select and enter the appropriate information in the following fields:
- Price type for taxation
- Volume pricing method. For more information, see Use Volume Pricing.
- a price grid
- Click Save.
The Fixed Price option allows you to set a discounted price for a product. This price is a lower version of the original product price. To offer a fixed price discount, do the following:
- Select the Fixed Price option from the drop-down menu.
- Select and enter the appropriate information in the following fields:
- Price type for taxation
- a price grid
- a
Note
Only select this option, if you want the original price and the new price to be shown. See the example below.
- Click Save.
Example
In the cart below, the original product price for Internet Security Basic Extended is $24.95. The discounted price is set at $20.

The Fixed Price (Volume Scale) option allows you to set a discounted price for a product. This price is a lower version of the original product price, and this option is useful for products that are sold in multiple quantities. To offer a fixed price discount for a product purchased in volume, do the following:
- Select the Fixed Price (Volume Scale) option from the drop-down menu.
- Select and enter the appropriate information in the following fields:
- Price type for taxation
- Volume pricing method. For more information, see Use Volume Pricing.
- a price grid
- a
- Click Save.
Note
Only select this option, if you want the original price and the new price to be shown.
The Recurring Price option allows you to set a unique price for each subscription billing event. These prices are lower versions of the original product price. To offer different prices for different subscription billing events, do the following:
- Select the Recurring Price option from the drop-down menu.
- Select and enter the appropriate information in the following fields:
- Price type for taxation
- a price grid
- Click Save.
Example
The fictional company, Shieldware, sets the original product price for the anti-virus software, Internet Security, at $34.95 for one year of use. However, if a customer signs up for a subscription, Shieldware will offer a discounted price for each billing interval. Using the Discount tab, they set the discounted price for the initial subscription payment![]() Exchange of money for goods and services in an acceptable amount to the customer where the payment amount has been agreed upon in advance. The customer can only pay with an accepted payment method. Each payment has an individual payment cost. (Interval 0) at $29.95 for one year of use. Thereafter, they add the following to the price grid:
Exchange of money for goods and services in an acceptable amount to the customer where the payment amount has been agreed upon in advance. The customer can only pay with an accepted payment method. Each payment has an individual payment cost. (Interval 0) at $29.95 for one year of use. Thereafter, they add the following to the price grid:
| Interval | Price |
|---|---|
| 0 | $29.95 |
| 1 |
$29.95 |
| 2 | $24.95 |
| 3 | $24.95 |
| 4 | $19.95 |
| 5 | $19.95 |
Important
If one or more of the products associated with a Recurring Price discount is not set up as a subscription product, the following warning will appear: At least one product is not a subscription. If this occurs, the discount for Interval 0 will be assigned to the non-subscription product.
The Recurring Price (Volume Scale) option allows you to set a unique price for each subscription billing event. These prices are lower versions of the original product price, and this option is useful for subscription products that are sold in multiple quantities. To offer different prices for a product subscribed to in volume, do the following:
- Select the Recurring Price (Volume Scale) option from the drop-down menu.
- Select and enter the appropriate information in the following fields:
- Price type for taxation
- Volume pricing method. For more information, see Use Volume Pricing.
- a price grid
- Click Save.
Important
If one or more of the products associated with a Recurring Price discount is not set up as a subscription product, the following warning will appear: At least one product is not a subscription. If this occurs, the discount for Interval 0 will be assigned to the non-subscription product.
Coupons
You can use the Coupons section to create new coupons or copy existing coupons for a promotion. Complete the following:
The coupon settings located at the top of the Coupons section apply to all coupon codes for a promotion:
Coupon Use Limit
The Coupon use limit option limits the number of times a unique coupon code can be used for a promotion.
Warning
This field limits the total number of times a coupon code can be used by all customers. For example, if you set this number to 1,000, this coupon can be used 1,000 times. If you set the number to one, on the other hand, only one customer gets the discount and then the coupon expires, no matter how many customers you have.
Tip
Depending on your business model, use the coupon use limit to create a sense of urgency for a promotion. For example, you can set the limit to 500 and create a promotion for the first 500 customers.
Case-Sensitive
In the coupon code section, there are two main ways to set up coupon codes:
Generate New Coupon Codes
You can generate new coupon codes.
- Click GenerateAdd Coupons > Generate Coupons. The Generate Coupons window opens.
- Enter information about how the coupon code should be created.
- Click OK. The coupon codes are added.
Tip
One way to name coupon codes is to personalize them by including customer information, such as an email address or phone number. Personalizing coupon codes can create a positive customer experience.
Tip
Coupon code names can be easily edited by clicking on a coupon code line item and entering text.
Copy Existing Coupon Codes
You can import your own pre-generated coupon codes from a spreadsheet, text file, or other source by copying and pasting the codes.
- In your source file, select and copy the coupon codes to be pasted.
-
Depending on your business model, you can create one coupon code for multiple uses, or multiple coupon codes for one use each. You can activate or deactivate a coupon code. The Quantity Used column displays how many times the coupon code has been used.
Products
Use the Products section to specify which products are used in the promotion. Complete the following:
1. In the List type drop-down, select:
- Include List to include specific products in the promotion. This option is best when you have a limited number of products in the promotion. Or
- Exclude List to exclude specific products from the promotion. This option is best when you have only a few products that are not included in the promotion.
Important
If you would like to include all products in a promotion, you need to choose the Exclude List with no products selected.
2. In the Available Products section, select the products to include in or exclude from the promotion.
- To filter the list of products, click in the Quick Find filter above the column header row, and enter search text.
- To select multiple items at once, press and hold the CTRL button on your keyboard while selecting the individual items, or, to select a range, click on the top line item in the range, and press and hold the SHIFT button on your keyboard while clicking on the bottom line item in the range.
3. Click the ![]() arrow, or drag-and-drop the items to the Selected Products section. The selected products move to the Selected Products section on the right.
arrow, or drag-and-drop the items to the Selected Products section. The selected products move to the Selected Products section on the right.
Tip
To search through a list of Selected Products, enter text in the search field at the top of the Selected Products section. You can navigate the match(es) using the arrows on the right.
4. Click Save.
Copy Content from the ListYou can copy content from the list and paste it into a text file or spreadsheet. For more information, see Search ✱ > Copy Information from Search Results List.
Open the promotion from which you want to remove products. Open the Products section. Follow these steps:
- In the Selected Products section, select the products to remove from the promotion.
To select multiple items at once, press and hold the CTRL button on your keyboard while selecting the individual items, or, to select a range, click on the top line item in the range, and press and hold the SHIFT button on your keyboard while clicking on the bottom line item in the range.
- Click the
 arrow, or drag-and-drop the items to the Available Products section. The selected products move to the Available Products section on the left.
 - Click Save.
Price Configurations
The Price Configurations section is used to specify a price configuration for the promotion. Complete the following:
-
- In the List type drop-down list, select:
- Exclude List to exclude specific price configurations from the promotion. This option is best when you have only a few price configurations that are not included in the promotion. Or
- Include List to include specific price configurations in the promotion. This option is best when you have a limited number of price configurations in the promotion.
-
- To select all price configurations, click Check All.
- To deselect all price configurations, click Uncheck All.
- Click Accept.
For more details on the combination of price configurations and promotions, see Special Case: Use the Applicable Price Configurator when Combining Discounts and Coupons.
Implement a Promotion for Customers
There are two ways to trigger a promotion for customers:
- A customer enters a coupon code during the checkout process.
- The coupon code is passed in the URL and the discount is automatically applied.
Customer Enters Coupon Code
In this implementation method, customers manually enter the coupon code into the coupon code entry field during the checkout process.
Example
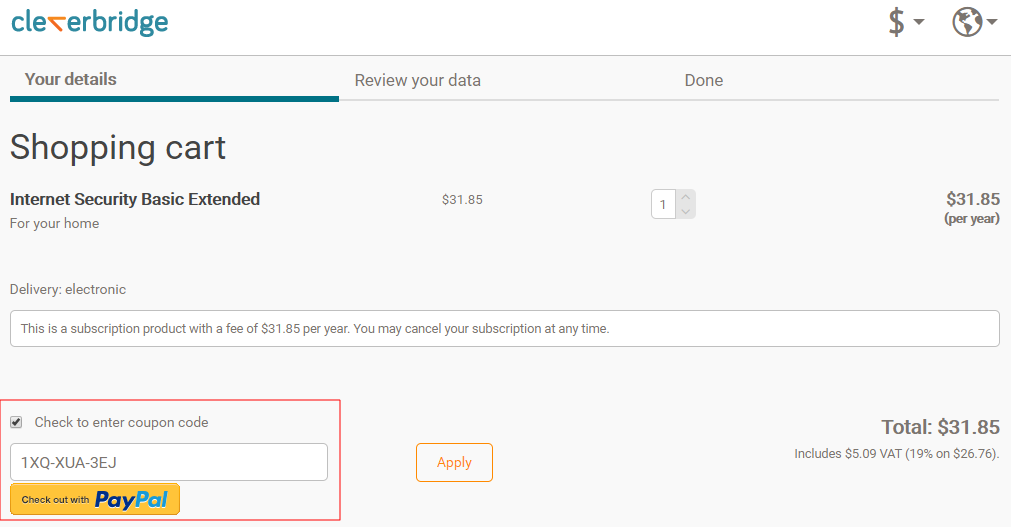
In the following cart, the customer clicks the Check to enter coupon code button to enable the coupon code entry field. The customer enters the coupon code and clicks Apply to apply the discount to the applicable product in the cart.
Coupon Code is Passed in URL
In this implementation method, the coupon code is added to the URL, and the discount automatically displays in the cart. The customer doesn't enter the coupon code.
This option can be implemented by using the Link Generator or by using parameters.
Link Generator
To pass a coupon code in the URL with the Link Generator:
- In the Use coupon code field of the Marketing section, enter the coupon code.
- The link is created with the discount automatically applied in the cart.
Parameter
To pass a coupon code by appending parameters to the URL, use the &coupon= parameter.
Example
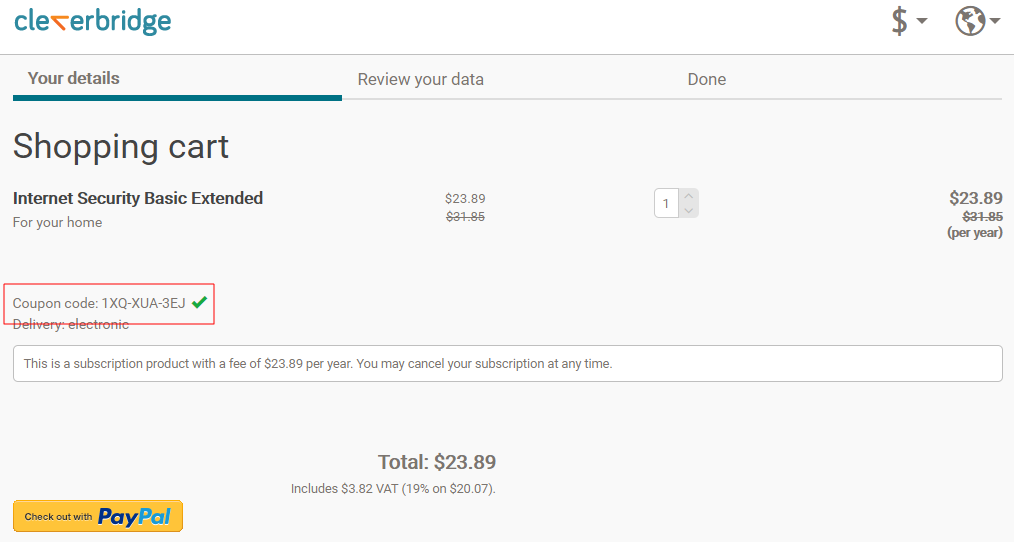
In the following cart, the discount was applied automatically. The URL for this cart includes the coupon code: &coupon=1XQ-XUA-3EJ
A complete checkout link is built according to the pattern:
https://<your.domain>/<your-accountID>/?scope=checkout&cart=<productID>&coupon=<your-promo-coupon>
Controlling the Coupon Code Entry Field
By default, the coupon code entry field:
- Displays in the cart when a product with an active promotion is added to the cart and when you are using the method of customers entering the coupon code
- Does not display in the cart when the
&coupon=parameter is used to pass a coupon code for a discount that is applied automatically
You can control whether or not the coupon code entry field displays, either in the Link Generator or by using parameters.
Link Generator
In the Marketing section, the Enable coupon code entry field in cart checkbox enables or disables the coupon code entry field in the cart.
Parameters
For information on how to use parameters to control the coupon code entry field, see List of Checkout Process Parameters > Coupon Settings.
Note
Controlling the coupon code entry field may also depend on your setup. It's possible that this feature is turned off by CSS or by your checkout configuration setup. For more information, contact Client Experience.
Best Practice: Conventions to Structure and Name your Data
The more structured your data is in the Cleverbridge platform, the easier it will be to find, maintain, and troubleshoot. This applies to how you manage:
- Recommendations
- Promotions
- MVT Multivariate testing (MVT) is a technique for testing two or more different variables in the checkout process to determine which variable creates more revenue or a higher conversion rate. campaigns
- Price configurations
- and so on
Generic Items
Make items as generic as possible so they can be reused. The more generic they are, the easier they will be to maintain in the future. If you create a handful of basic items that can be duplicated or reused, you won’t have to create new ones again and again.
Example
Suppose you want to offer several seasonal promotions throughout the year. Instead of creating a new promotion for every offer, such as for Easter, Christmas, and New Years, you can create one promotion and give it a generic name in our platform, such as "Seasonal Special." You can then dynamically change it to suit each specific seasonal offer.
Naming Conventions
Name your items with a structure that can be easily scanned and that tells you what it is. A good naming convention could include
- the type of item you are naming
- the product name associated with it
- the price, country, coupon code, or other relevant information
An example that follows good naming conventions could look like this:
Type / Product Name / Price, Country, Coupon Code, and so on
Example
- Email – Product Name @ $19.95
- Email – Product Name – Germany
- Email – Product Name – 30GIFTFORYOU
- Affiliates – Product Name – Europe
- Default MVT – Opt In – US