Private preview: Self-Serve Checkout Setup
The Self-Serve Checkout Setup gives you full control over your checkout processes, enabling you to create tailored, optimized checkouts easily.
Private preview (current phase)
- Managed by Cleverbridge.
- Selected clients are invited to participate in the preview and provide feedback.
- The private preview is free of charge until the public launch.
Features included in the private preview phase
The private preview phase covers key checkout capabilities designed for a seamless and optimized purchasing experience.
- Self-serve setup and optimization through SCM
- Ability to set up and sell both perpetual and subscription products
- Fully localized, although currently only available for US customers
- Increase of cart value with cross-sells and sub-sells
- Support for discounts via coupons and price rules
- Payment options: Credit card and PayPal only
- One 2-column layout optimized for a B2C audience
- Newsletter signup feature
- Value bar with security seals and money-back guarantee
- Fully mobile responsiveness, including several optimizations not available in the legacy checkout
- Google Tag Manager for all tracking purposes (requires customer cookie consent)
- High service availability for uninterrupted operations
Ongoing enhancements
We continuously enhance the Self-Serve Checkout with regular updates, deployed every two weeks. Each update introduces new features, refinements, and performance improvements to ensure a seamless and optimized checkout experience. These ongoing improvements will keep your checkout up to date with the latest advancements in eCommerce technology, helping you stay competitive and deliver the best possible user experience.
- Our full payment option catalog, including an optimized Strong Customer Authentication process
- Multiple pre-optimized layouts and designs
- Product capabilities: Upsells, plan selections, don’t leave layer, free trials, price scaling, payment schedules, and backup CDs
- Wait don’t leave layer (cart abandonment)
- Marketing tools: incentive banners, Trustpilot, G2 Reviews
- B2B optimizations, including an optimized address form, purchase orders, check/money orders, bank transfers, quotes, and reseller portal
- Additional integration options: In-app checkouts, popups and embedded checkouts (iframe)
- Additional integration options: Session URLs (SURL) and Unique URLs (UURL) and Dynamic Products
- Product catalogs
Why choose self-serve checkout setup?
The Self-Serve Checkout Setup gives you full control over managing your checkout process independently. It streamlines the creation and customization of checkout flows, minimizing reliance on the Cleverbridge team. Whether you're new to Cleverbridge or a long-time user, this flexible and scalable solution allows you to tailor the checkout experience to meet your unique business needs and provide the following benefits:
- Full control and flexibility: Design and manage your checkout experience independently, without relying on Cleverbridge Professional Services or the Customer Experience team. From basic configurations to advanced customizations, you have the tools to create an optimized checkout flow tailored to your brand.
- Seamless brand integration: Customize every detail, from fonts to colors, ensuring your checkout blends seamlessly with your website for a consistent and professional customer experience.
- Optimized for conversions: Leverage built-in A/B and MVT testing to experiment with different checkout flows and fine-tune them for maximum conversion rates. The Self-Serve Checkout Setup empowers you to find the best approach for your audience.
- Mobile-first experience: Designed for seamless performance on mobile devices, including features like automatic credit card scanning on iOS. This enhances the mobile shopping experience, making checkouts faster and more convenient.
- Future-ready technology: Regular updates ensure your checkout remains aligned with the latest advancements in eCommerce, keeping your business competitive and your checkout experience state-of-the-art.
- Comprehensive documentation: Access built-in guidance within SCM, along with in-depth documentation featuring step-by-step instructions to help you make the most of the Self-Serve Checkout Setup.
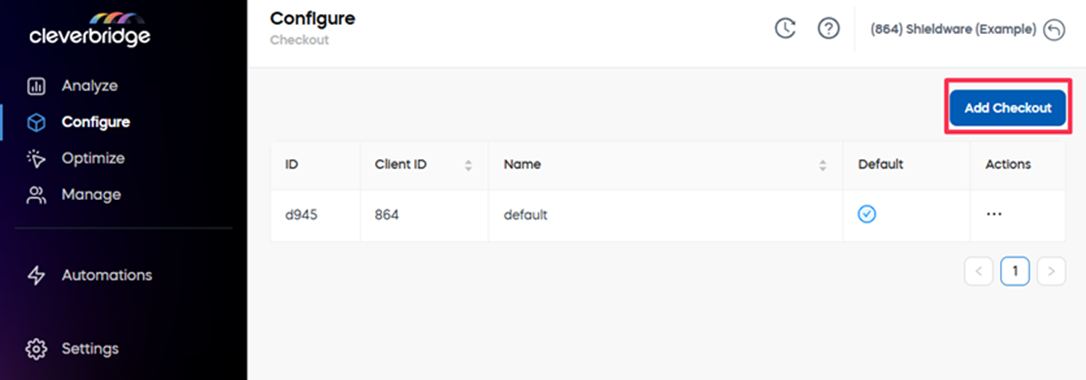
Create a checkout
To launch the checkout creation, go to Configure > Customer UX > Checkout. Select Add Checkout.
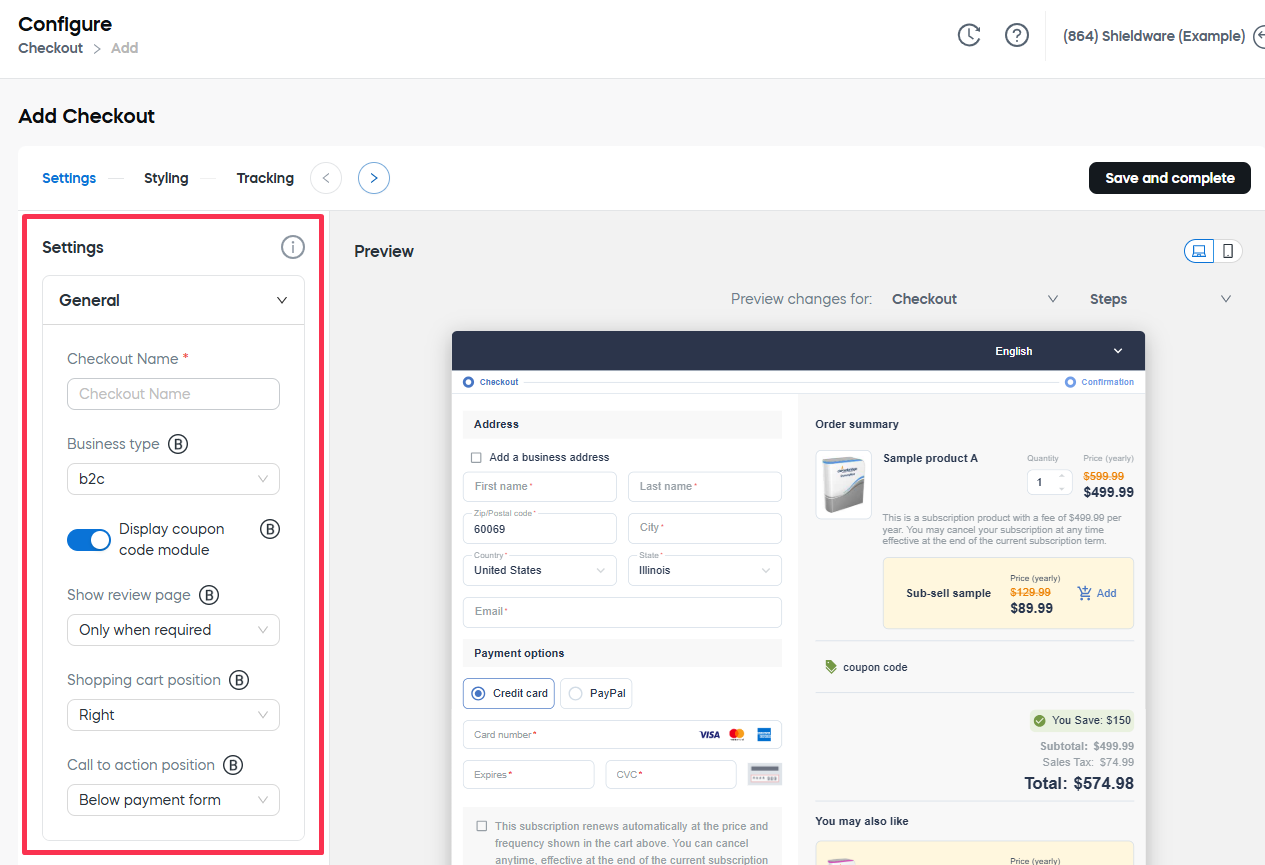
Define the checkout settings
When a checkout is added, the Settings area is opened by default. Here you can define key elements such as pricing display, layout customization, security seals, and product presentation.
As you are changing the settings, they will be immediately applied to the preview on the right. The icons in the right top corner of the preview area, allow to switch between the desktop and mobile view.
The Settings area contains the following sections:
General settings
Configure the following General settings to define the checkout experience:
- Checkout name: Determines the internal name of the checkout experience. Spaces are not allowed.
- Business type: Defines whether the checkout is tailored for B2C or B2B customers, affecting whether net or gross pricing is displayed.
- Display coupon code module: Controls whether a coupon entry field is available during checkout.
- Show review page: Specifies if customers review their order before finalizing the purchase. This step can be defined as required, optional, or displayed only in regions where legally mandated
- Shopping cart position: Determines whether the shopping cart appears on the left or right side of the checkout page, which may influence conversion rates and order value.
- Call to action position: Defines the placement of the primary action button within the checkout flow.
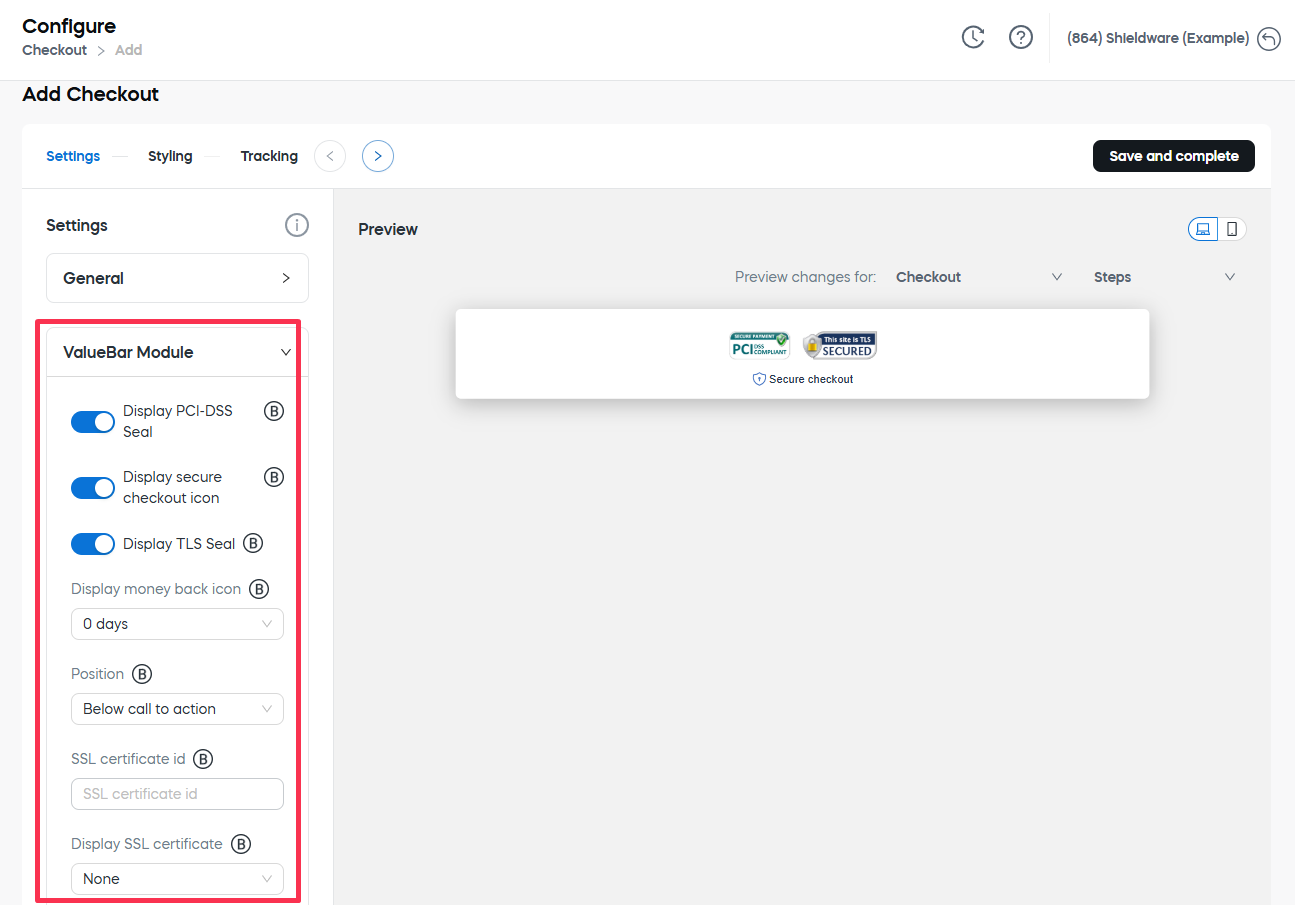
ValueBar Module settings
The ValueBar Module manages the display of security and trust seals on the checkout page:
- Display PCI-DSS Seal: If enabled, shows the PCI-DSS (Payment Card Industry Data Security Standard) compliance seal.
- Display secure checkout icon: If enabled, displays the secure checkout icon.
- Display TLS Seal: If enabled, displays the TLS security seal.
- Display money back icon: Controls which money-back guarantee icon appears on the checkout. This setting affects only the icon display; refund policies remain unchanged and must be updated through a Cleverbridge account manager.
- Position: Defines where the value icons are placed within the checkout layout.
- SSL certificate ID: Assigns the SSL certificate ID for verification.
- Display SSL certificate: Specifies which SSL certificate is displayed as a seal.
Products Module settings
The Products Module controls how product details are displayed during checkout:
- Display product information: Defines how the product details are shown. The possible options are:
- None: Product details are not shown.
- Short description: Short product description is displayed.
- Additional name information: Additional information defined for the product is displayed.
- Display a product image: If enabled, displays a product image.
- Display product tooltip: If enabled, shows a tooltip with additional product details.

Footer Module settings
The Footer Module controls the placement of the logo on the checkout page. The logo can be displayed in the footer, or only in the header, allowing for flexible branding customization. 
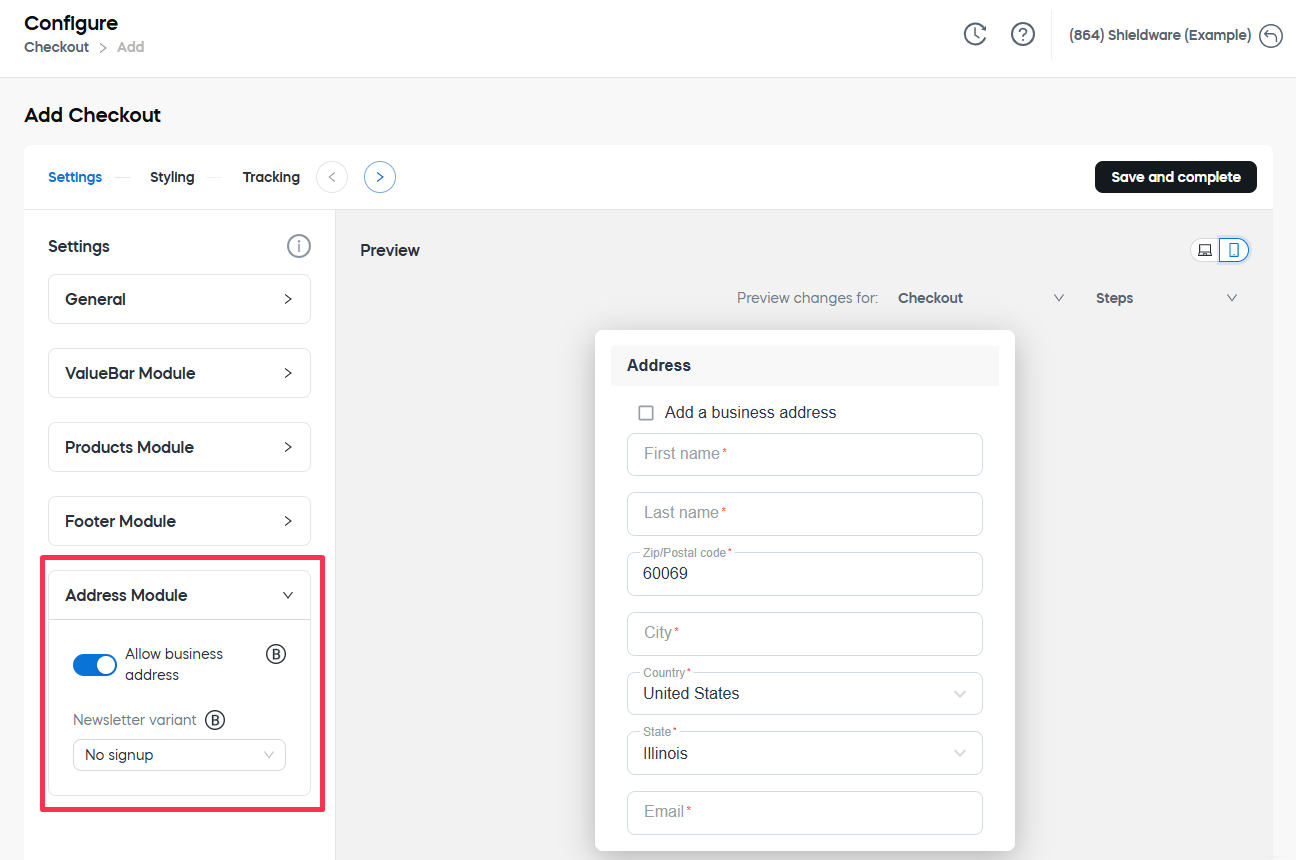
Address Module settings
The Address Module manages address input and newsletter subscription options:
- Allow business address: If enabled, allows customers to enter a business address.
- Newsletter variant: Determines newsletter subscription options:
- Checkbox: Allows customers to opt in to the newsletter.
- No signup for the newsletter: Disables newsletter subscription during checkout.
Define the styling options
Styling options provide control over the visual design of your checkout. They allow customization of fonts, colors, layout, and other elements to ensure a seamless brand experience and a visually cohesive checkout process.
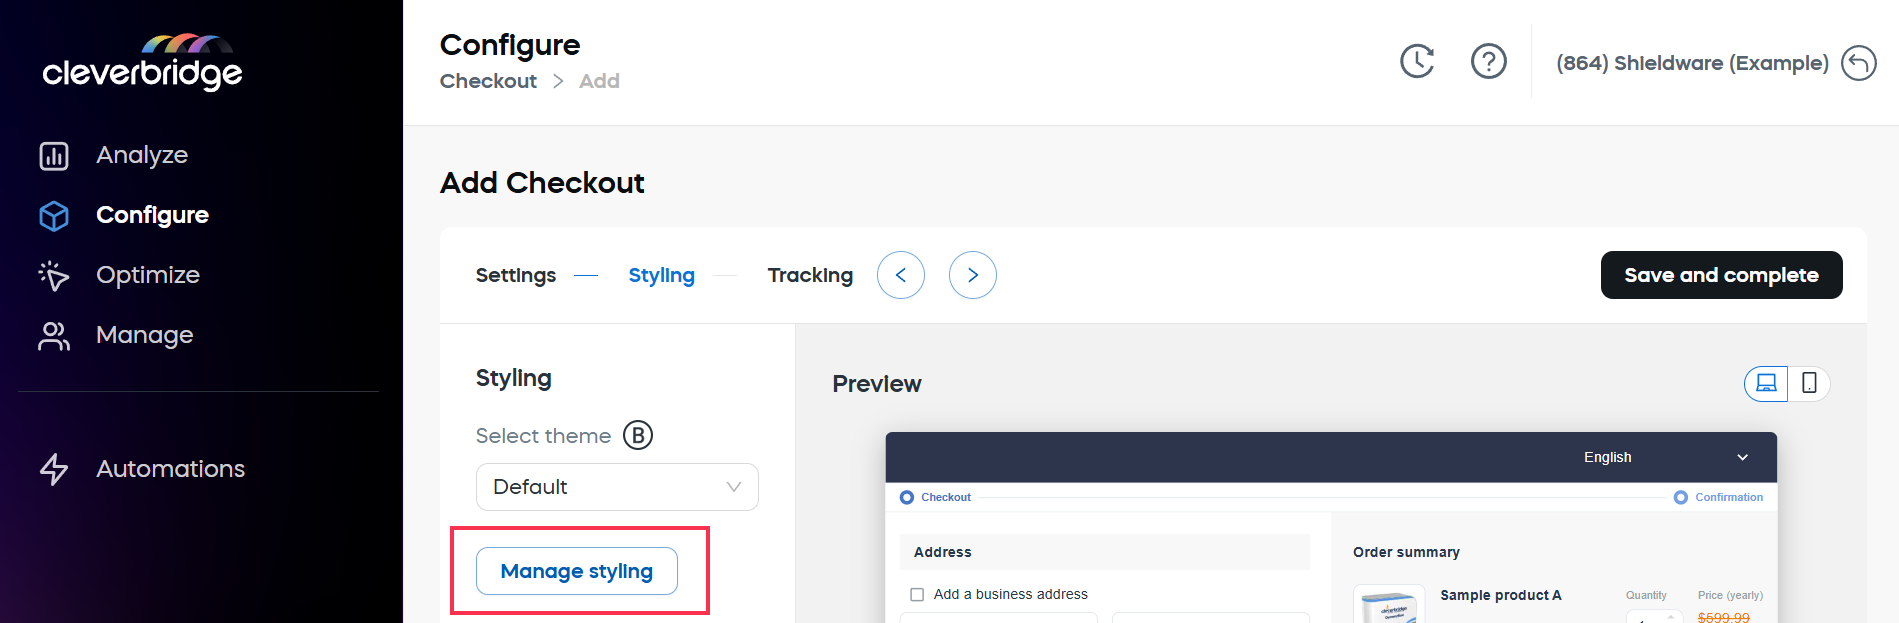
Select theme
Select the styling theme. All the styling themes available for your account are displayed in the Select theme drop-down list sorted by their name.
Create a new theme
You can also create a new theme.
Go to Configure > Customer UX > Styling or—if you are already in the Styling tab of a checkout— click the Manage styling button.
 .
.
Create the theme as described in the Create styling themes guide.
When you click Save and Complete, you will return to the checkout settings. 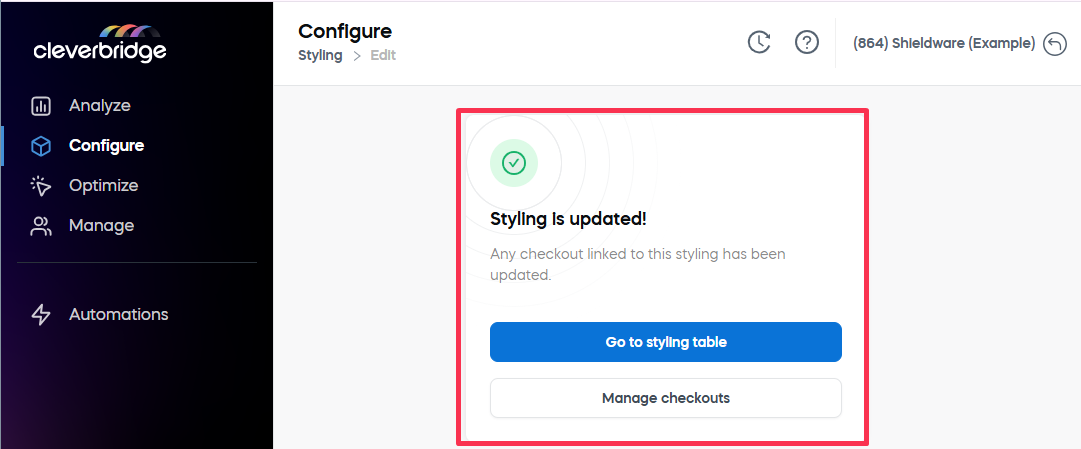
You can always return to the Styling tab by navigating to Configure > Customer UX > Styling.
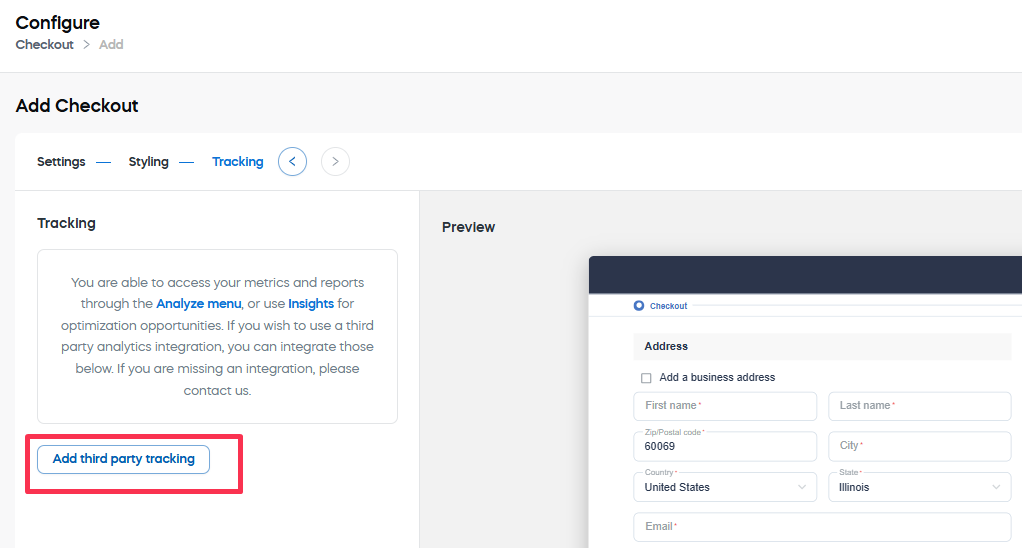
Configure checkout tracking
You can access your metrics and reports through the Analyze menu, or use Insights to identify optimization opportunities. For third-party analytics integrations, use the Tracking tab of a checkout.
You can do it when creating a checkout, or at any other time from **Configure > Customer UX > Checkout.
- Click the Add third party tracking button.
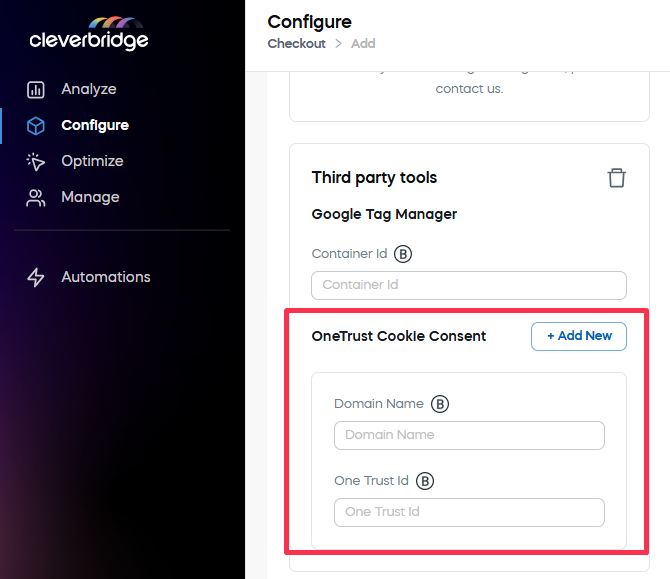
Set-up Google Tag Manager integration
You can integrate Google Tag Manager into your checkout setup to track customer interactions such as clicks, page views, and conversions. To enable the integration, define the Container Id. ![]() .
.
The Container ID is a unique identifier for your GTM setup, typically formatted as GTM-XXXXXX. You can find it in your Google Tag Manager account under the Admin section, listed next to the container name.
Configure OneTrust Cookie Consent
Before any tracking can occur, customers must provide consent for cookies. This ensures compliance with privacy regulations such as GDPR and allows you to manage how cookie consent is handled within your checkout flow.
To integrate OneTrust Cookie Consent, define the following settings:
- Domain Name: URL of the website where consent settings apply.
- OneTrust ID: a unique identifier provided by OneTrust to link your checkout with your cookie consent settings. For more details, see Finding My Account ID.
 .
.
This setup ensures that tracking scripts and analytics are only activated after the user has provided the necessary consent.
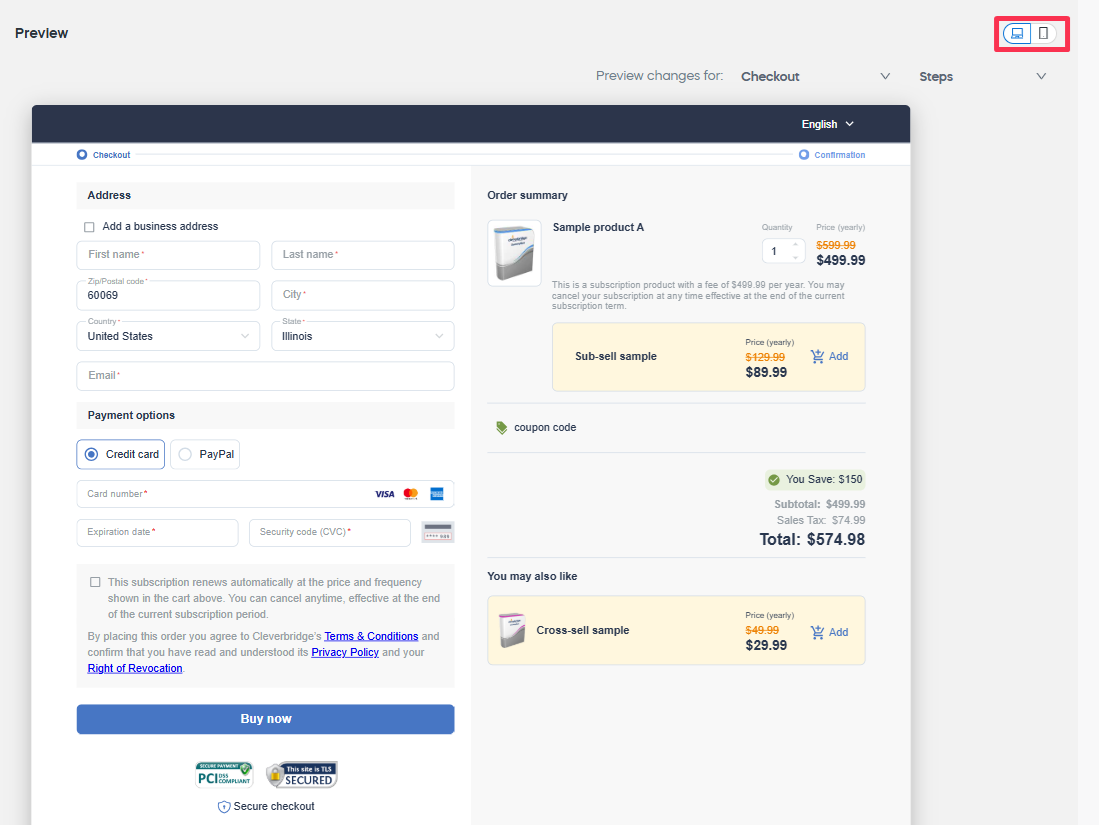
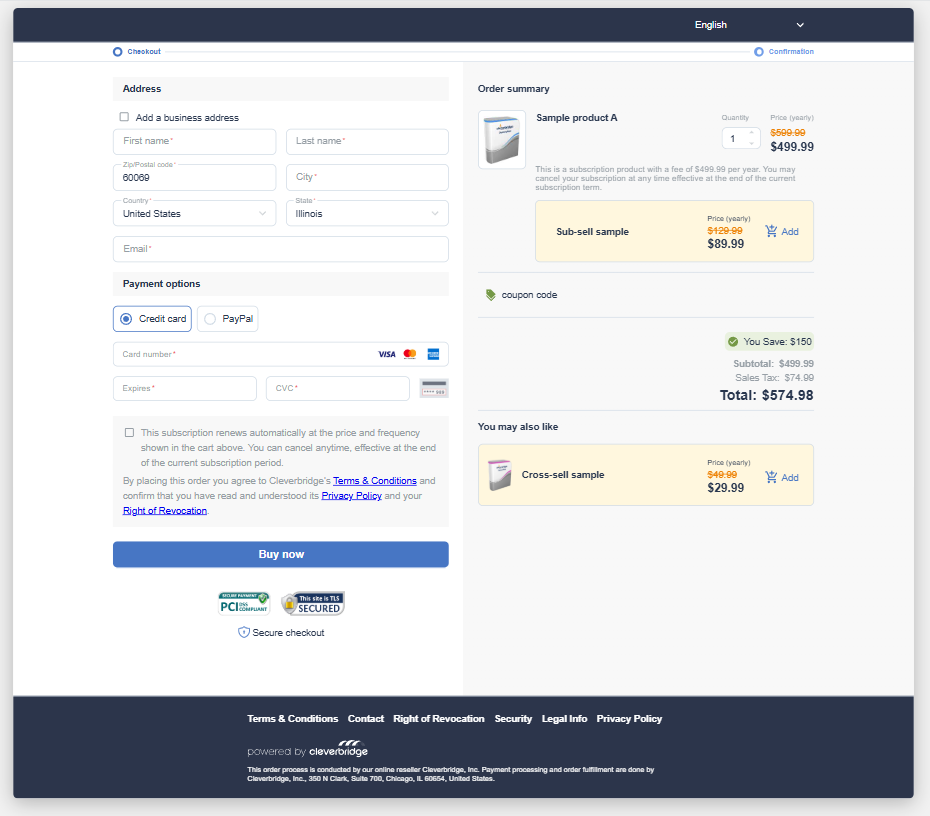
What the customer will see
When customers go through your checkout, they will see a smooth, branded experience that matches the settings you have configured. The first release features a simple and functional design, using a two-column layout to clearly present key elements, including:
- Order summary: Provides a clear breakdown of the items in the customer's cart, including pricing, applicable taxes, and total cost.
- Address and payment modules: Collects customer details and payment information in a structured and user-friendly format.
- Security elements: Displays a value bar with trust seals, money-back guarantees, and other indicators to reinforce customer confidence.
- Newsletter signup: Offers customers the option to subscribe to your newsletter directly from the checkout page.
Planned options
The current version of the checkout is just the beginning. While the initial release is fully functional, ongoing updates will introduce more customization options, enabling you to refine and optimize the checkout experience to better suit your business needs. These enhancements will provide greater flexibility, allowing you to tailor the checkout flow for improved conversions and stronger brand alignment.
Keep an eye on future releases not to miss such features as:
- Multiple layouts: Ability to choose between different layout options to better suit your business, such as switching the position of the order summary and payment sections.
- Additional customization options: Advanced settings for layout positioning, font choices, button styles, and more.
- Ongoing enhancements: New elements, such as free trials, upsells, and promotional banners, will be introduced, allowing you to continuously improve your checkout’s performance and customer experience.