Product pricing settings
Pricing settings help you shape how a product is priced, presented, and billed across different selling scenarios. Use them to define product-level pricing behavior, including tax handling, quantity-based discounts, subscription billing, and currency-specific prices.
These settings work together with the broader Cleverbridge pricing capabilities. For pricing strategy, pricing models, price configurations, price rules, and discount logic, see Pricing.
Used by product type
| Product type | Pricing settings |
|---|---|
| Base product | Does not use pricing settings because base products are templates and are not sold directly. |
| Perpetual product | Base price including volume pricing method and price type for taxation, custom product price, and price settings. |
| Recurring product (plan) | Base price including volume pricing method and price type for taxation, custom product price, subscription interval, sync next billing date with last payment, and price settings by subscription interval. |
| Bundle product | Base price including volume pricing method and price type for taxation, custom product price, optional subscription billing, subscription interval if subscription billing is enabled, sync next billing date with last payment, and price settings. |
Base price settings
The Base Price section contains pricing options that define how the product price is calculated, discounted by quantity, and taxed.

Volume pricing method
The volume pricing method lets you set different prices based on the quantity of the product purchased. Basically, this is a product-level way to offer quantity-based discounts. (For broader pricing strategy, including price configurations, price rules, promotional pricing, and discount logic, see Pricing).
Correct volume pricing settings can help you increase average order value and encourage customers to purchase products in bulk. The following options are available:
- All-units discount: The price of each unit is equal to the unit price for the lowest volume tier reached, so the same discounted unit price is applied to all units once a quantity tier is reached.
- Incremental discount: A discount is applied only to units above a specific price tier.
- Top-down discount (packages): Customers buy packages of units at a fixed price.
For bundle products, Volume Pricing Method is always set to All-units discount.
The following example shows how the same price tiers produce different totals depending on the volume discount method.
| Quantity threshold | Unit price |
|---|---|
| 1 | $100 |
| 2 | $80 |
| 5 | $70 |
| 10 | $50 |
| 20 | $40 |
Assume the customer wants to buy 15 units.
| Discount method | How the price is calculated | Total price | Average price per unit |
|---|---|---|---|
| All-units discount | All 15 units use the 10-unit tier price: 15 × $50 | $750 | $50 |
| Incremental discount | 1 × $100 + 3 × $80 + 5 × $70 + 6 × $50 | $990 | $66 |
| Top-down discount (package pricing) | One 10-unit package for $500 + one 5-unit package for $350 | $850 | $56.67 |
Volume pricing method details
The selected volume pricing method affects:
- how easy the discount is for customers to understand,
- how the per-unit price changes as the quantity increases,
- whether the total price always increases,
- and how much revenue is generated at higher quantities.
Price graphs
For a better understanding of the per-unit price dynamics when a customer selects a higher volume, the following table compares the price behavior for each volume discount method.
| Method | Per-unit price graph | Total price graph | Comment |
|---|---|---|---|
| All-units discount | 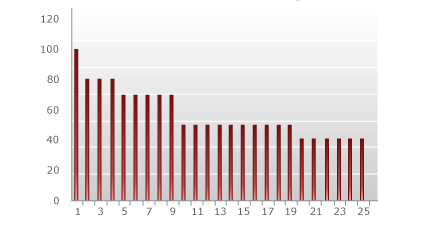 | 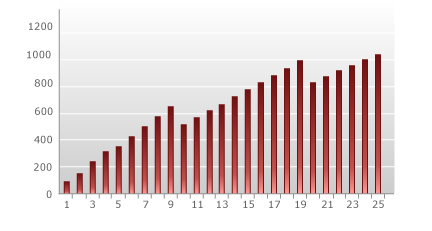 | The per-unit price is easy to understand because all units receive the same price once a tier is reached. However, the total price can drop at tier thresholds, which means a customer may buy more units but pay less in total. |
| Incremental discount |  | 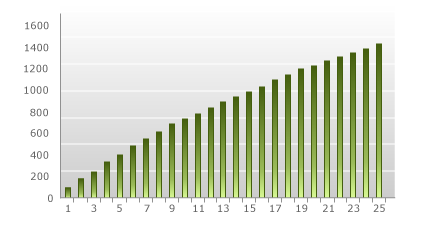 | The average per-unit price decreases gradually as more units are added. The total price always increases, so there are no step-down points where selling more units results in less revenue. |
| Top-down discount (package pricing) | 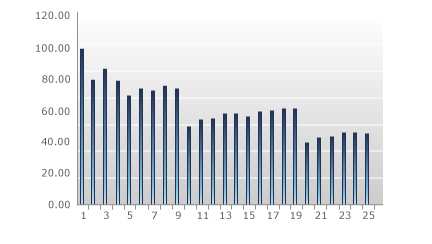 |  | The best per-unit prices occur at fixed package quantities. Customers may adjust their order quantity to match a package, which can lead them to buy more or fewer units than originally planned. |
Volume pricing methods comparison table
Each volume pricing method has trade-offs. The best choice depends on how simple the pricing should be for customers, how predictable the revenue should be, and how clearly the shopping cart can explain the calculation.
| Method | Advantages | Disadvantages |
|---|---|---|
| All-units discount |
|
|
| Incremental discount |
|
|
| Top-down discount (package pricing) |
|
|
Price type for taxation
The Price Type for Taxation setting defines whether the product price is treated as a tax-inclusive gross price or as a tax-exclusive net price for taxable transactions.
This setting affects how taxes are calculated and displayed in the shopping cart. It also affects whether your revenue remains consistent across tax jurisdictions or whether customers see the same marketing-friendly price.
The Price Type for Taxation setting applies only to taxable transactions. If no tax is applied for a customer’s country or region, this setting does not affect the price calculation.
For US customers, the purchase price is always treated as the net purchase price. State sales tax is calculated on top of this price, and county, city, or special district taxes may also apply. For more information, see Tax rates for digital products.
In the Price Type for Taxation drop-down list, select one of the available options:
Gross price
Use Gross price when you want to display a single tax-inclusive price to customers in countries with taxation obligations.
This approach can provide a better shopping experience because the customer sees a clear, marketing-friendly price. However, if customers in different countries pay the same gross price, different tax rates affect the revenue you generate.
For example, if German customers with 19% VAT pay the same gross price as Danish customers with 25% VAT, the higher VAT rate in Denmark reduces the net revenue more than the lower VAT rate in Germany.
Bottom line: Your revenue fluctuates if you select this option, but you can display marketing-friendly pricing.
Net price
Use Net price when you want to preserve a consistent revenue stream. The configured product price is treated as the net price, and tax is calculated on top of it.
This means you can generate the same revenue on taxable transactions, regardless of the applicable local, state, or national tax rates and regulations.
This approach does not provide the same marketing-friendly price display. Different customers from different countries can pay different gross prices in the shopping cart. It is important to note that you will not know the exact end price the customer pays, because tax rates differ by country, state, county, city, and special district.
The following example shows how the same defined product price can produce different results depending on whether the price is treated as gross or net.
Assume the defined product price is 39€.
| Customer type | Tax rate | Gross price result | Net price result |
|---|---|---|---|
| EU Customer 1 in Germany | 19% VAT | Customer pays 39€. Tax is included, so your net revenue is 32.78€. | Your net revenue is 39€. Tax is added, so the customer pays 46.41€. |
| EU Customer 2 in Denmark | 25% VAT | Customer pays 39€. Tax is included, so your net revenue is 31.20€. | Your net revenue is 39€. Tax is added, so the customer pays 48.75€. |
| Non-EU Customer in a non-tax country | 0% tax | Customer pays 39€. Your net revenue is 39€. | Customer pays 39€. Your net revenue is 39€. |
With Gross price, customers can see the same final price, but your net revenue changes depending on the tax rate.
With Net price, your net revenue stays the same, but customers can see different final prices depending on the tax rate.
Price type for taxation comparison table
| Price type | Advantages | Disadvantages |
|---|---|---|
| Gross price |
|
|
| Net price |
|
|
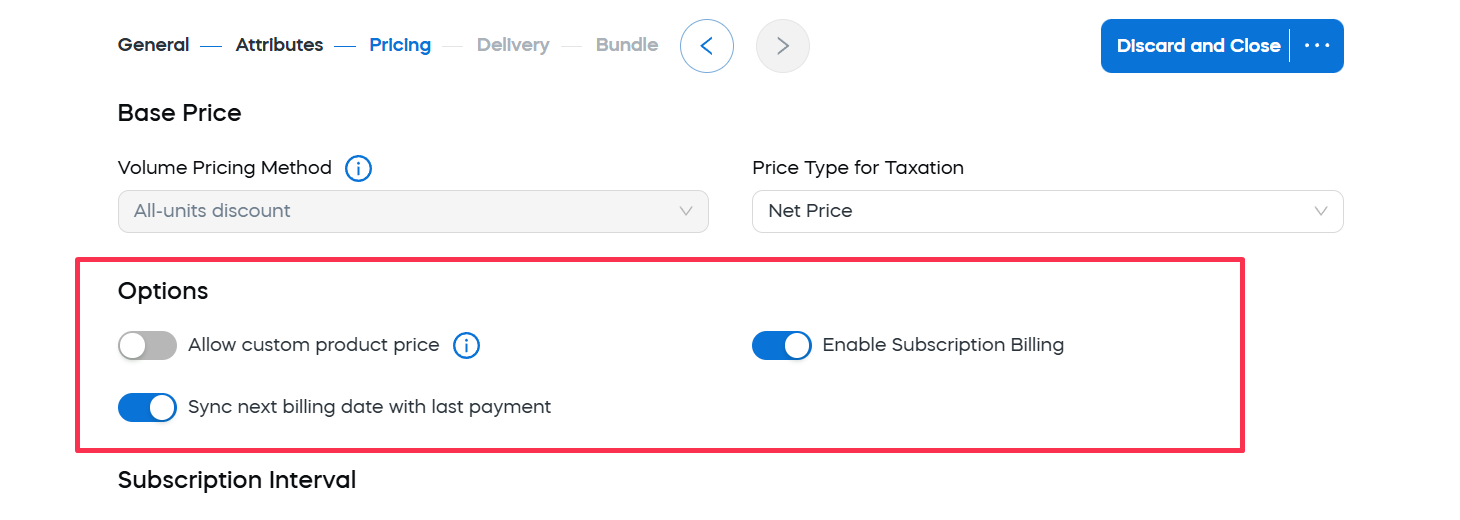
Options
The Options section contains additional pricing controls that appear below the Base Price section. The options available in this section depend on the product type.
| Product type | Options section |
|---|---|
| Perpetual product | No options are available. The Price Settings table appears directly below Price Configuration. |
| Recurring product | Allow custom product price and Sync next billing date with last payment are available. The Subscription Interval section is always enabled for recurring products. |
| Bundle product | Allow custom product price and Enable Subscription Billing are available. If Enable Subscription Billing is enabled, additional subscription settings appear, including Sync next billing date with last payment and the Subscription Interval section. |
Allow custom product price
The Allow custom product price toggle activates a dynamic price for the product. Dynamic products are created with parameters that are added to the URL.
This option is available for recurring products and bundle products.
Use this option when the product price should be supplied dynamically through URL parameters instead of relying only on the configured static product price.
For more information, see Dynamic Products.
Before a dynamic product price can be applied to a product, this functionality must be activated for your account and a seed must be defined in the Additional Details section of Account Setup in Commerce Assistant. See Account setup.
Sync next billing date with last payment
The Sync next billing date with last payment toggle synchronizes the next billing date with the date the last payment was received.
This option is available for recurring products and subscription-enabled bundle products.
If a payment is late, this option automatically recalculates the next billing event date based on the date when the customer’s last payment was received. This is useful when the next billing event should follow the successful payment date rather than the originally scheduled date.
Enable subscription billing
The Enable Subscription Billing toggle is available for bundle products.
Use this option when the bundle should renew as a subscription.
When this option is enabled, additional subscription settings appear, including:
- Sync next billing date with last payment,
- Subscription Interval,
- trial or paid start options,
- subscription price settings.
For more information about interval settings, see Subscription Interval.
Subscription interval settings
The Subscription Interval section appears for recurring products and subscription-enabled bundle products. It defines how the subscription starts and how often recurring billing events happen.
Subscription interval settings define how subscription billing is timed. For recurring products, these settings define the billing timing of the subscription product. For subscription-enabled bundles, these settings define the billing timing of the bundle subscription.
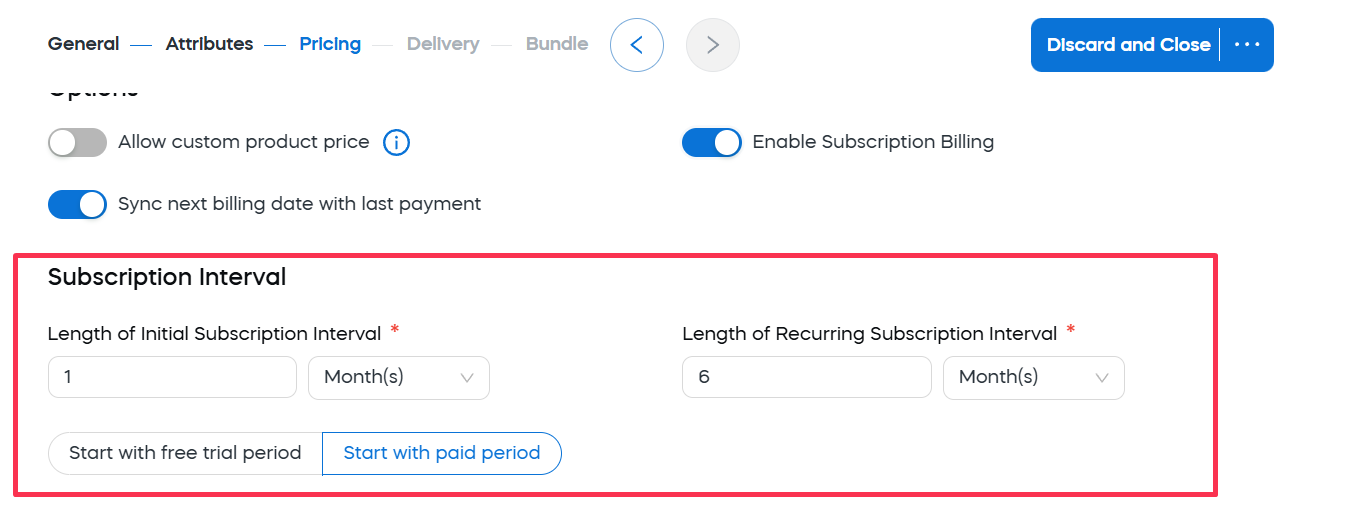
| Field | Description | Format | Use to | Applies to |
|---|---|---|---|---|
| Length of Initial Subscription Interval | Time between signup and the first recurring billing event. | Number and time unit | Define when the first recurring billing event occurs. | Recurring, subscription-enabled bundle |
| Length of Recurring Subscription Interval | Time between recurring billing events after the first billing event. | Number and time unit | Define how often customers are billed after the initial interval. | Recurring, subscription-enabled bundle |
| Payment Schedules | Payment schedule configuration for setups where separate subscription and billing intervals are needed. For more details, see Create payment schedules. | Selection or configuration | Apply separate billing and subscription intervals. | Recurring |
| Start with free trial period | Starts the subscription with a free trial. | Segmented option | Let customers start the subscription before the first paid period. | Recurring, subscription-enabled bundle |
| Start with paid period | Starts the subscription with a paid period and no free trial. | Segmented option | Charge customers at the start of the subscription. | Recurring, subscription-enabled bundle |
Initial and recurring subscription intervals
Use the Length of Initial Subscription Interval to control when the first recurring billing event happens after signup. In many cases, this is the same as the recurring interval. For example, a monthly subscription often has an initial interval of one month and a recurring interval of one month.
Set a different initial interval when the subscription should start with a special first period. This can be useful when you want to align the first renewal with a campaign, onboarding period, contract start date, or delayed first billing event.
Use the Length of Recurring Subscription Interval to define the regular billing rhythm after the first billing event. Common examples are:
- 1 month for monthly subscriptions,
- 3 months for quarterly subscriptions,
- 12 months for annual subscriptions.
Shorter recurring intervals can make the initial purchase easier for customers because each payment is smaller. However, they also create more billing events and can increase the chance of failed payments or payment interruptions.
Longer recurring intervals can improve revenue predictability and reduce billing frequency, but the higher upfront amount may make the purchase decision harder for some customers.
Choosing between a free trial and a paid period
Use Start with free trial period when customers should be able to try the product before the first paid period begins. This can reduce purchase hesitation and support acquisition-focused offers.
A free trial can be useful for products where customers need time to evaluate the value of the product before committing. However, it can also delay revenue and may attract customers who do not intend to continue after the trial.
When Start with free trial period is selected, Subscription Interval 0 is disabled for editing in the price settings table. Select Start with paid period to edit the price for this period.
Use Start with paid period when customers should be charged at the beginning of the subscription. This is usually better for products that already have clear value at the time of purchase, products with strong purchase intent, or offers where immediate revenue recognition is important.
A paid start can reduce trial abuse and make revenue more predictable, but it may create more friction for customers who want to evaluate the product first.
Using payment schedules
Use Payment Schedules when the subscription interval and billing interval should not be the same.
This can be useful when customers receive access for one period but pay according to a different schedule. For example, a product can have an annual subscription term while payments are collected monthly, quarterly, or according to another agreed billing rhythm.
Payment schedules can support more flexible commercial models, but they also make the setup more complex. Before using them, make sure the billing behavior is easy to explain to customers and fits the intended subscription model.
Payment schedules are available for recurring products. For detailed setup instructions, see Create payment schedules.
For broader subscription pricing models and implementation examples, see Select a pricing model. For information about subscription lifecycle, billing, renewals, changes, and cancellations, see Subscriptions.
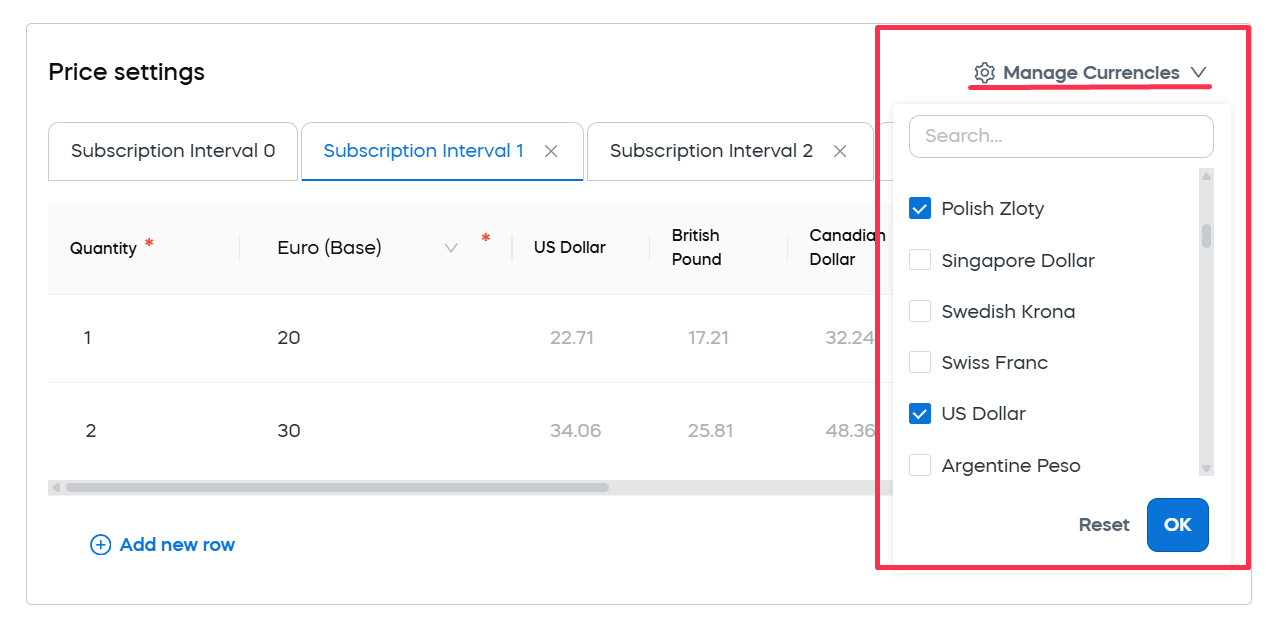
Price settings
The Price settings section is where you enter prices for the selected currencies and quantities.
For recurring products and subscription-enabled bundle products, price settings can also include separate tabs for subscription intervals.
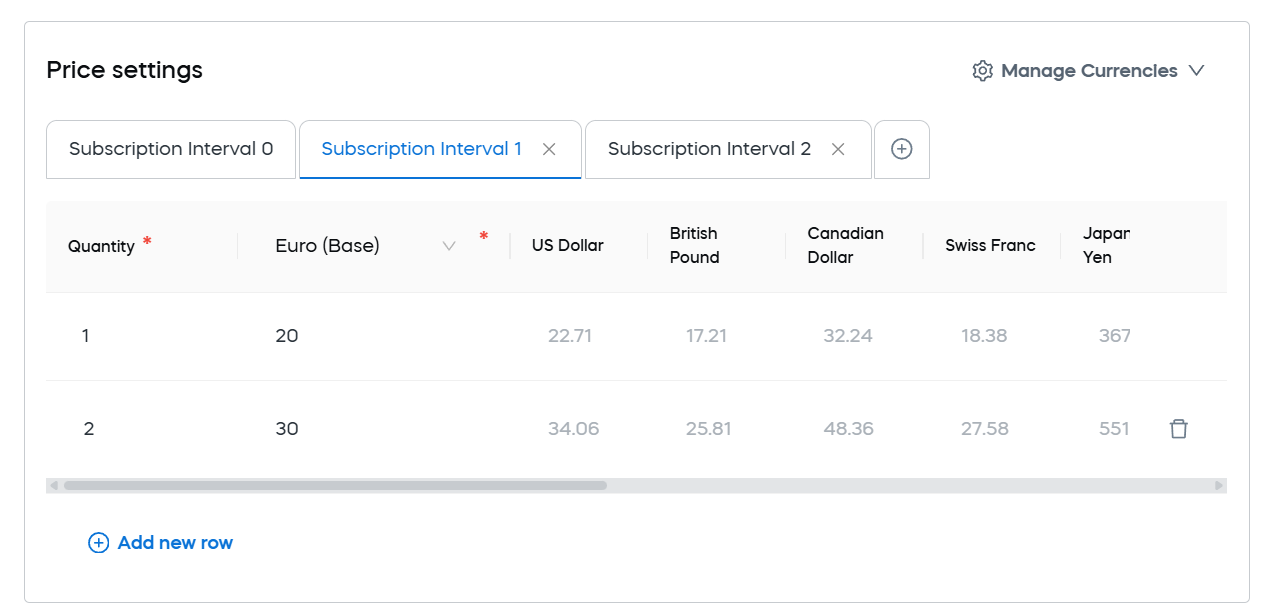
| Field | Description | Format | Use to | Applies to |
|---|---|---|---|---|
| Quantity | Quantity tier for the price row. | Number | Define prices for one or more quantity tiers. | Perpetual, recurring, bundle |
| Base currency | Main currency used for the product price. | Currency amount | Define the product price in the base currency. | Perpetual, recurring, bundle |
| Additional currencies | Other currencies selected in Manage Currencies. | Currency amount by currency | Define localized prices for additional currencies. | Perpetual, recurring, bundle |
| Manage Currencies | Opens the currency selector for the price table. | Currency selection | Add or remove currency columns in the price table, if your user permissions allow it. | Perpetual, recurring, bundle |
| Subscription Interval tabs | Price tabs for subscription intervals. | Tabbed price table | Define prices for different subscription intervals. | Recurring, subscription-enabled bundle |
The currencies that you can add or edit in the price table depend on your user permissions and the currency setup for the account.
If you cannot add a currency or define prices in additional currencies, contact your Customer Success Manager.
Base currency and additional currencies
The Base currency is the main currency used for the product price. Define this price first because it is the reference price for the product.
Use Additional currencies when you want to control the exact price customers see in other currencies. This is useful when you do not want to rely only on automatic currency conversion, or when you want localized prices that better fit a specific market.
For example, you may want to set a rounded, marketing-friendly price in each target currency instead of using a converted amount with decimals.
Additional currency prices are useful when:
- you sell in multiple markets,
- you want localized prices for specific currencies,
- you want predictable customer-facing prices,
- you want to avoid prices that look automatically converted.
They also require more maintenance. If you define prices manually for additional currencies, review them when exchange rates, pricing strategy, or regional market conditions change.
Use Manage Currencies to add or remove currency columns in the price table. Depending on your permissions, this control may be hidden or disabled. If you need to add a currency that is not available to you, contact your Customer Success Manager.
Quantity tiers
The Quantity column defines the quantity tier for a price row. Use quantity tiers together with the selected Volume Pricing Method to define how the product price changes when customers purchase multiple units.
Quantity tiers are useful when you want to encourage customers to buy more units by offering a lower unit price at higher quantities.
For example, you can define one price for a single unit and lower prices for larger quantities, such as 5, 10, or 20 units. The way these tiers are applied depends on the selected volume pricing method.
Use quantity tiers when:
- customers commonly buy more than one unit,
- you want to increase average order value,
- you want to offer bulk discounts,
- you need different prices for different purchase quantities.
Avoid unnecessary quantity tiers if most customers buy only one unit or if the discount structure would be difficult to explain in the cart.
Subscription interval price tabs
For recurring products and subscription-enabled bundles, price settings can include tabs for subscription intervals.
Use these tabs to define prices for different subscription periods. For example, you may need separate prices for the initial subscription interval and the recurring subscription interval.
This is useful when the first period has a different price from later billing periods, such as:
- a discounted introductory period,
- a free trial followed by a paid recurring period,
- a paid setup period followed by a different renewal price,
- a bundle subscription where the initial and renewal prices differ.
When Start with free trial period is selected, Subscription Interval 0 is disabled for editing in the price settings table. Select Start with paid period to edit the price for this period.
Use subscription interval price tabs carefully. If the initial and recurring prices are different, make sure the pricing is clearly communicated to customers so they understand what they pay at signup and what they pay later.